Rigging Shaders
- Article
- 9 Sep 2024
- 8 min read

For character rigs especially, it is often necessary to expose some sort of control over the properties of the shaders to the animator or the lighting artist on a shot level. This can be for the purpose of picking from different variations of a character. Or it could be to gain more fine grained control over the look, especially when using more stylized NPR shading methods.
I have previously mentioned this technique in less detail in a previous blog post about the character shading on Wing It. But since then, we have improved it slightly and it is useful and specific enough to receive its own spotlight and explanation. I will first go over the technical aspects of the method and then show how it can be used in a pipeline.
The Problem
While library overrides provide a lot of flexibility when it comes to animation and handle all the complicated dependencies of an advanced character rig, they also require to localize and duplicate all that complexity wherever you want to make changes even to simple, individual settings.
So in a pipeline like ours, where the data is linked between different files (Library -> Animation -> Lighting) you end up potentially needing to override properties of a character on different levels. And while you can technically create a library override of a library override in an arbitrary amount of nested layers, this comes with a significant amount of technical debt, that might not be necessary to create in the first place.
Library overrides
Let me give you a bit more technical background to explain the full picture regarding library overrides:
Library overrides create a full local copy of the hierarchy that is overridden so that you can make local changes in a file, and then Blender keeps those up-to-date with any changes to the library version of that hierarchy. So to override a data-block, let's say the armature object of a character rig, everything that depends on that data-block needs to be overridden as well. This includes data-blocks that contain drivers that are referencing properties of the rig. And on a more fundamental level, library overrides don't support overriding every type of data-block in Blender yet.
Simply put: To create a full copy of a character whose material depends on the rig, you need to copy the material as well as the rig. And this is simply not supported yet for various reasons.
This problem can be mitigated by off-loading the dependency on the rig to data-blocks that can be overridden. Both for shader node-groups and Geometry Nodes modifiers for example that can be done using object properties.
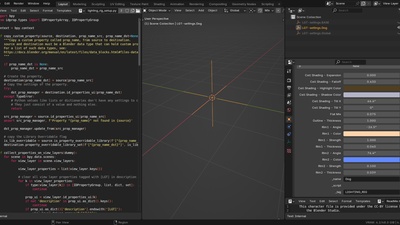
For shader nodes you can create a custom property on the object level and use the `Attribute` node to pass this information based on the name into the shader node-tree. This object property can then reference anything from the rig, since it can be overridden (just make sure the `Library Overridable` setting is enabled). For Geometry Nodes this works by using the modifier inputs. So instead of creating a driver referencing the rig or an object/collection pointer inside of the node setup, make sure to expose the parameter in question and put the reference on the modifier inputs, which are part of the object properties.
The solution
We see that library overrides, by themselves, are then not enough for every type of use-case, especially when it comes to controlling properties of a material.
View Layer Properties

We solved this situation by entirely separating the actual character with all its data-blocks and the rig into separate hierarchies, even separate files. Instead of creating a direct dependency of the character on the rig, we create the dependency on a property of the active view layer (which is not a data-block), that is referred to by its name. This view layer property provides a central, neutral point of communication that is then written to by the rig and read out by the character inside of the shot file. That way there is no direct reference between the character and the rig.
In addition to the view layer properties you can also define a target object in the character hierarchy that will receive the properties as custom properties. These can then be referenced directly with a driver rather than using the active view layer.
Automating python script execution

Blender supports the ability to automate all sorts of operations and provide custom functionality and user interface using its python API. This functionality can also be called by executing scripts that are created as text data-blocks in the internal text editor of Blender. And besides running a script manually from the user interface you can also enable the Register setting in the text properties. This will ensure the script is run automatically on every file load containing it.
This is a technique that we use a lot here at the Blender Studio to do all sorts of quick fixes on top of linked data in a reliable and non-intrusive way. Our Lighting Overrider tool to create on-the-fly overrides for individual properties, that we use a lot in our lighting process is fully based on this concept for example.
Attaching python scripts to data-blocks
What turns this ability to execute scripts automatically on file load into a powerful mechanism that provides the solution to our problem is to combine it with the fact that you can attach scripts to a data-block.
Simply by running C.object['script'] = D.texts['name_of_script.py'] from the python console you can attach the script data-block, which executes automatically on every file load, to an object data-block. That means, any file which references that object in some way, say by linking and overriding it, will run the script on file-load.
That way you can create all kinds of powerful assets that come with their own python functionality. It's for example also how the Cloudrig UI in the 3D viewport is ensured to show up when a character is linked to a scene.
Lighting Rigs
The concept that we came up with, combining these different ideas and allowing us to create controller objects for linked data, we call a 'Lighting Rig'. A lighting rig is just an empty object that contains a set of custom properties and has a python script attached to it which will make its properties available on the view layer wherever it is used.
And so the script that is attached to every lighting rig collects all the lighting rig objects in the scene and sets up a copy of their properties on the view layers, that are linked to the lighting rig property with a driver.
Effectively, this means that any property that is added to the lighting rig is made available as a view layer property in any scene where the lighting rig is used. From there, it can be picked up by shaders and drivers without setting up a direct dependency of the character on the lighting rig object.
Usage
Besides all the details of what the actual script does, let me show you how you can use this kind of setup in practice:
Start by downloading the base setup file:
Video
Here is a video walking through the different steps and aspects of setting this up as a production lesson. The individual steps are also listed in text form below.
Steps
Setting up the lighting rig
- Duplicate base empty object
- Set the
_namecustom property - Add arbitrary object custom properties
Setting up the asset
- Link the lighting rig into the asset file (outside of the asset hierarchy) and override it
- Optionally: Create lighting rig target empty object (inside of the asset hierarchy) with a custom string property called
_tagset toLIGHTING_RIG-TARGET - Reload the file to trigger the script execution or execute it manually
- Create references to properties on view layer/target object
- Use the
Attributenode set toView Layerfor shaders - Create drivers from the lighting rig target object if you created this, for performance reasons
- Alternatively create drivers of the
Context Propertytype pointing to the active view layer and set the path to["property_name"]
- Use the
Setting up the shot
- Link and override all required lighting rigs into shot file which has the linked character
- Change and animate parameters as necessary (you can always remove the override from a single parameter to reset it to its state in the lighting rig file)
- Optionally: Link the overridden lighting rigs further into other files if required for your pipeline
Examples
Besides using this to control the shaders of individual characters, this can also be used to control properties of multiple characters in one single place, on a global level. For example, we set up the control of toggling on the brush strokes of our characters on the Gold production with a global toggle on top of additional toggles per asset; on Wing It we had global control for the outline thickness that would be picked up by the base shader shared by all the characters.
Issues
It should be mentioned that, of course, this method also doesn't come without its own issues. One of the main large benefits of the concept of library overrides is that you can easily create multiple copies of the same character that can be controlled completely individually. With this method that is not the case, since all copies of the character in the file will pick up the same properties from the lighting rig.
3 comments

Thanks for the explanation! At work we tend to use a lot of custom properties on the characters rigs (usually on the root bone) to control specific things in the shaders, like a color change or the mix between textures. Nice to know we can also store "view layer properties" on an empty like that. It will definitely be very useful :)

Simon, thanks so much for sharing all this information. It opens up so many possibilities. I've just finished work on an animated short and wish I'd known about this stuff a year ago! It will certainly be very valuable on the next one.
@Duncan Rudd That's great to hear, I'm never sure how much these very technical production oriented topics are useful for most people, but it definitely something worth talking about! And yes, it's not the most easy-to-find solution, but turns out to be quite useful and intuitively working, once set up.
Join to leave a comment.