Live Retopology at BCON22
- Article
- 18 Nov 2022
- 4 min read

Presentation & Demo
Recently at the Blender Conference 2022 I've held a live tutorial presentation on Retopology. In essence it's a short version of the live retopology of Snow and conveyes a lot of the same information found in the Stylised Character Workflow Course.
I took a bunch of characters from the Blender Open Movies as practical examples to go over the theory of retopolgy and what makes it "good".
For that I aimed to demystify the though process and complexity of retopology by drawing a map with Grease Pencil. And while the modelling process wasn't that much of a focus, I still included a 30 min live demonstration of how to keep the modeling loose and fun.
Deconstructing the Puzzle
Here's a bit of a recap with important information & also the files from the presentation.
The leading question is: What makes a good production ready retopology?

There are general things to keep in mind like:
- Capture the needed shapes & details of the original sculpt (Base & when subdivided)
- Structure your topology so areas are easy to select
- Keep it performance efficient for both viewport & render
Also while it's ideal to only use quads and keep their stretching relatively low, there are also cases where Tris/Ngons are used. I won't judge as long as you know what you're doing ;)
From here we get into more detail: What would make my retopology good?
For this you should do as much design exploration and testing as possible before retopology starts. Try to only think of one thing at a time. Don't design while also having to make final topology choices.
Expression & pose tests help a lot in answering design questions!
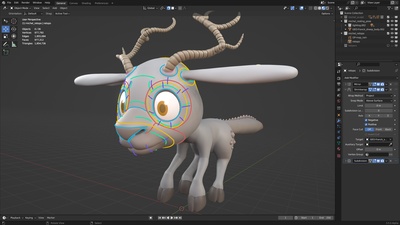
Mapping Instead of Guessing
Every character is unique, but the guides to follow for their topology usually are not. Try to annotate these on your model and as a result create a map of requirements.

1. Edge Flow
This is the general direction of your loops. Often if follows the shapes and muscle movements of your character.
This tends to be very universal across any character.
2. Primary Creases
These are essential to preserve creases and detailed shapes with more density. Add a loop + 2 proximity loops to preserve the hard edge when subdividing.
3. Secondary Creases
These are only creased on certain expressions, so they might be smooth by default. Add loop + 2 proximity loops, but with more distance by default. When rigged the proximity loops can be pinched.
4. Articulation
For areas like eyebrows, eyes and the mouth, add at least three loops + 2 proximity loops each.
This ensures you have the minimum required loops to do most needed expressions.
(Based on the "Three Curve Principle" by Brian Tindall)
Tip: Keep the top & bottom symmetrical!
5. Expression Bounds
How far does (or should) the mouth stretch? This way you know how far to extend circular patches, before adding poles past this boundary.
6. Landmarks
If other objects need to move in unison, mark it this way. If the object on top shares the same loop placement it's easier to anchor it to the skin.
Only What You Need
While retopologizing try to not think too hard about adding 'the right amount of loops'. Just extrude and insert whatever is just enough. Later on loops can be added and everything can be realigned and relaxed.
This makes it a lot easier to work with as you go. Because you tend to think in 'patches' and 'structure' instead of 'verts, edges & faces'. And the end result will also likely end up more optimized.

Reusing an existing retopology is also a huge time saver, and is especially common for realistic characters. Einar from Project Heist was done that way. You can download a realistic base mesh, as well as sculpting base meshes on this website.
And if any of the above mentioned guides are not necessary for your retopology, ignore them.
The retopology for Sprite Fright and Project Heist ended up not requiring any secondary creases for example.
That's because Sprite Fright had creases as fake 2D lines on top, and Project Heist used sculpted subdivisions for more details.
Files, Links & More
I would like to offer you some more goodies! If you are interested in the setup for the Grease Pencil lines that I've created you can find that here:

I do recommend you to just use the Annotate tool though. It's faster and available immediately.

If you'd like to try out the retopology for the character Michel too, here's the sculpting file for that:
This also includes the original sculpt.
This is all licenced as CC-BY of course so sue it as you please!
Here are some more links if you're interested:
- Retopology Chapter of the Stylized Character Workflow
- Retopology Chapter of the Realistic Chatacter Workflow
- Cheat Sheets for Retopology
- A full recap of the creation of Snow
Enjoy!
3 comments

What is the addon that you use for your overlays? you have a lot more control over your overlays than the default blender gives you, id like to also have that level of control. your list of choices is far superior to the default blender selection, i observed this in the first few minutes of watching the snow retopology in the youtube playlist this post links to
@Wade Schneider Sorry can you be more specific. Time stamps and links would help a lot.
@Julien Kaspar Sorry for late reply, i ended up observing the video again and working out it was the pencil tool with different colors assigned, i have always used an external program for drawing on my screen and thought that was what it was, but since working that out i have now been using the blender drawing tool. Great video & great work.
Join to leave a comment.