Realistic Character Workflow
3: Shapes and Wrinkles

This chapter will focus on sculpting for animated facial expressions and wrinkle maps.
There are different methods to introduce dynamic wrinkles and realistic deformations for the face. There will be some links and mentions of those but the focus here will be on the one we used in Project Heist. Some more quick information can also be found in this Blog Post.
FACS
For context it's useful to start with the basis on which the facial expressions were created. For the facial expressions and head movement we based this on the Facial Action Coding System or 'FACS' in short. This is a comprehensive list of all possible facial and head movements that the human muscles allow, categorised into "Action Units".
For the most control and variation it might be best to create a shape key for each of these action units. Chris Jones went a lot into detail in his forum thread. Depending on the surface stretching or via masks it's possible to use height maps for additional surface details.
Creating so many shape keys for individual FACS also has the side effect that it becomes hard to determine which shape key is moving which vertex. Adding more than two shape keys together will increasingly lead to unforsee drifting of vertices that can be hard to trouble-shoot.
The workflow of creating the skin details also heavily relies on creating high-frequency detail maps first and then clone stamping them across the face. This is fantastic for skin that didn't age that much yet.
But a face that is marred with wrinkles and complexions is a lot more effort. Exposing this level of detail also might make him seem too young.
So this workflow is great for younger characters and lower polycounts. But because of the age of our character we wanted to achieve more shape variation between the different facial deformations. See Adam Springs workflow when starting with scan data.
We were also aiming to sculpt and paint the skin details more by hand or create them procedually.
We wanted to find something that gives us a similar amount of control but is still optimised to render to render fast. So in our example we went a similar but different approach.
The 'Shapes' Approach
Grouping FACS
For Project Heist we grouped and mixed complimentary action units. This was mostly for optimisation purposes since the Eevee render engine will not be able to handle a lot of separate displacement maps well. Any action unit that is roughly deforming in similar directions or are not contradicting each other can be mixed into what we called a "Shape".
For time and budget restrictions we also decided to not sculpt all possible action units, since some are quite specific and will never be animated in the movie. And some are even always obscured by the beard of the character.
We ended up grouping action units into 6 shapes:

- Shape A: 'Stretched'
- AU 01: Inner Brow Raiser
- AU 02: Outer Brow Raiser
- AU 05: Upper Lid Raiser
- AU 27: Mouth Stretch (+ a bit of an ear pull)
- Shape B: 'Sneer & Funnel'
- AU 09: Nose Wrinkler
- AU 10: Upper Lip Raiser
- AU 16: Lower Lip Depressor
- AU 22: Lip Funneler (An exaggeration of 10/16)
- Shape C: 'Smile'
- AU 06: Cheek Raiser
- AU 12: Lip Corner Puller
- Shape D: 'Closed'
- AU 14: Dimpler
- AU 43: Eyes Closed
- Shape E: 'Frown'
- AU --: Worried Brows (Not an official AU, but a unique shape by mixing two of them)
- AU 20: Lip Stretcher
- Shape F:'Compressed'
- AU 04: Brow Lowerer
- AU 17: Chin Raiser
- AU 44: Squint
There were many action units and facial deformations like the eye movement and rotational/non-linear deformations that were more effective to rig via bones. Using our current rigging setup CloudRig, gave us an excellent base to achieve these instead of using shape keys.
Using Shapes
To give a bit of general context of how these shapes can be used, here is a short overview before going into more detail.
Shapes were used as corrective shape keys.
With recent changes in Blender to better support shape key based rigging we were able to first sculpt the facial shapes we needed, and then recreate the result with the rig as close as possible. Once that is done, the shape can be applied to those bone positions as a corrective shape key to integrate the exact shape into the rig.
Any details smaller than the topology were baked into textures.
The shapes were baked to height maps which could be used for additional displacement after subdividing.
Some would also be baked as normal/bump maps for even more details in the shading.
With masks we separated the shapes.
For that we mainly used the bone weights of the rig. So whenever a bone would affect an area of the face, the same weights would trigger the shape key.
We also converted the weights into general attributes that can be used in the material nodes.
They are the factor to blend the baked maps into the material.
Creating Facial Shapes
The sculpting process of facial shapes will be the best example of the overall workflow.
Volumes and skin sliding
An extremely important aspect to be aware of is the sliding of the skin. Facial expressions are not just sculpted onto the face wherever you like. You need to respect the stretching and wrinkling of the face to sell the realism and avoid 'swimming' of facial features.
We started out by sculpting shape keys instead of sculpt layers. This helps to ignore details and focus on the general volumes and shifting of the surface first. It also provides a much faster and responsive environment to sculpt in and slide layers.
Tip: "Enabling wireframes as an overlay can be a great reminder of where the skin slides to and from."
This workflow is very similar to the one described in the Stylised Character Workflow. More detailed information can also be found there.
An alternative approach that we didn't test but would be worth to investigate is to sculpt the expressions in detail first and afterwards map the skin sliding to match the expressions. This would make the process of expression sculpting more free and fast, but would require a tedious remapping of sculpted detail from the original sculpt to the skin-sliding adjusted mesh.
Visualising stretching via Geometry Nodes
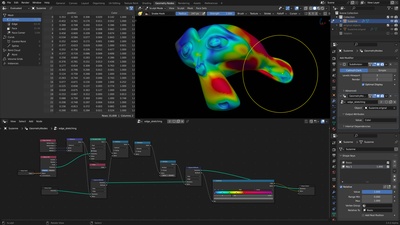
Keeping an overview of how far any particular point of the shape key has deformed is not easy. While this can be estimated by sliding the shape key influence, we started using a different method.

With geometry nodes it's possible to compare the vertex positions with a duplicated original of the object. This information can then be converted to a color attribute and visualised in the viewport.
Keeping track and averaging the deformations becomes easier that way.
You can download the geometry nodes setup over here:

More information and instructions are in the file.
Converting to Sculpt Layers
Once the general skin sliding and volume deformation is complete it's time to go into more detail.
To convert a shape key into a sculpt layer it's just important to create a new layer, enable the shape key and use "Save Layer". The operator will save any difference between the current visual geometry and the combined, saved geometry from the enabled sculpt layers.
Once all shape keys have been saved as sculpt layers you can disable and ignore the shape keys.
Tip: "It might be beneficial to keep them around for later, if needed.
Just disable them with the checkmark instead of deleting them."
Detailed Shapes
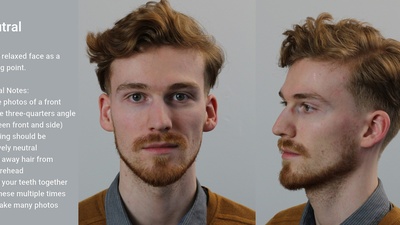
For this stage we heavily relied on photo and video references. We did have a live model and other various close-up video references, but we unfortunately cannot share these.
What we can share instead is the brief that was created for the video shoot. This can be instrumental in getting correct and useful reference:


Detailed close-up reference will help in mapping out the various small volume shifts and wrinkles that happen during the expressions. This will take a lot of work and time to get right.
Pay attention to the skin sliding. Don't just invent creases and details.
Since painting is not yet possible on multires modifier subdivisions, try to map out the important reoccurring details on a separate sculpt layer and blend it in when needed as a guide.

For Projects Heist the Shapes were sculpted on 2-3 subdivisions for a reasonable amount of detail. Anything above that is reserved for tertiary details like pores and wrinkles and shouldn't affect the general proportions that much anymore.
A completely alternative approach would be to use scanned data as a base to sculpt on. But this was not accessible to us at the time and would've heavily influenced the character design creation as well.
Wrinkles & Aging
There's a reason why only at this point we really focus on wrinkles and signs of age.
Iterating on Age

In real life our wrinkles and facial landmarks are heavily influenced by how we use our face over our lifetime. If we smile a lot it's far more likely that we develop crows-feet and deep laught-lines. The same goes for wrinkles on our forehead, cheeks and neck and any other part of our face that moves a lot.
While designing the character it was vital to already sculpt aging and wrinkles but now it's important to be very accurate and realistic with it.
Study portraits of old people and the directions the wrinkles follow. Use this to already sketch in a subtle map of creases into the face, to suggest a flow and where wrinkles should be most prominent.
Make sure that these flow guides are following the facial shapes by toggling them on and off to compare. By the end you should have a good idea of where wrinkles should form. If the result doesn't look right, then iterate on the expression shapes further.
The process of sculpting the wrinkles will be a constant back & forth of sculpting the shapes and wrinkles. They both heavily influence each other and the sculpting process should resemble the process of aging a person over time.
ABC Wrinkle Maps
Previously we mentioned the ABC wrinkle map approach to achieve displacement details for expressions. This can still be used in the Shapes approach for tertiary wrinkle details in bump maps.

Make sure to sculpt the wrinkles on three separate layers:
- One for wrinkles from Compression
- One from Stretching (Which usually goes perpendicular to the first layer)
- Another one for areas where the two are used at the same time
The third layer is useful since the combination of the first two will usually lead to unique wrinkles. For example, crossing and curved wrinkles will form when looking worried with the forehead, by pulling up the brows and pushing in the center of the brows
The wrinkle maps were sculpted with 5-6 subdivisions. This should give the most amount of detail, even with small integrations into the pores and complexions if needed.
Eventually through this process you'll end up with the final wrinkle and shape layers.