Blender Studio
  • Films
  • Projects
  • Training
  • Characters
  • Tools
  • Blog
  • Join
  • BLENDER.ORG

    • Download

      Get the latest Blender, older versions, or experimental builds.

    • What's New

      Stay up-to-date with the new features in the latest Blender releases.

    LEARNING & RESOURCES

    • Blender Studio

      Access production assets and knowledge from the open movies.

    • Manual

      Documentation on the usage and features in Blender.

    DEVELOPMENT

    • Developers Blog

      Latest development updates, by Blender developers.

    • Documentation

      Guidelines, release notes and development docs.

    • Benchmark

      A platform to collect and share results of the Blender Benchmark.

    • Blender Conference

      The yearly event that brings the community together.

    DONATE

    • Development Fund

      Support core development with a monthly contribution.

    • One-time Donations

      Perform a single donation with more payment options available.

Training Highlights
Stylized Rendering with Brushstrokes
Geometry Nodes from Scratch
Procedural Shading Fundamentals
Stylized Character Workflow

Training types
Course Documentation Production Lesson Workshop

Training categories
Animation Geometry Nodes Lighting Rendering Rigging Shading
Film Highlights
Wing It!
2023
Charge
2022
Sprite Fright
2021
Spring
2019
Project Highlights
Project DogWalk
Interactive
Gold
Showcase
BCON24 Identity
Showcase
Fighting with Grease Pencil
Article
Course
Toon Character Workflow
1: Concept Art
  1. 01

    Intro

    Free
  2. 02

    Concept Art

  3. Archibald Concept
2: Modeling
  1. 01

    Blender Basics

    Free
  2. 02

    File Setup

  3. 03

    The Body

  4. 04

    The Head, Hat and Scarf P.1

  5. 05

    The Head, Hat, and Scarf P.2

  6. 06

    The Face P.1

  7. 07

    The Face P.2

  8. 08

    Shape Keys Mouth

3: Rigging
  1. 01

    Rigify Rigging P.1

  2. 02

    Rigify Rigging P.2

  3. 03

    Rigify Rigging P.3

  4. 04

    Weight Painting

  5. 05

    Face Rigging P.1

  6. 06

    Face Rigging P.2

  7. 07

    Scarf Setup

4: Shading
  1. 01

    The Toon Shader P.1

  2. 02

    The Toon Shader P.2

  3. 03

    The Outline - Backface Culling

  4. 04

    Tune Up

  5. 05

    Rendering

5: Animation
  1. 01

    Intro

  2. 02

    Basics of Animation in Blender

  3. 03

    Walk Cycle P.1

  4. 04

    Walk Cycle P.2

  5. 05

    Walk Cycle P.3

  6. 06

    Advanced Animation Dissection

Assets
  1. Archibald Free
  2. Archibald Concept Art

Login to view this content

Join Blender Studio for just €11.50/month and get instant access to all of our training and film assets!

Login Join Blender Studio
Francesco Siddi
Francesco Siddi Author
License CC-BY
Report Problem
5: Animation

Walk Cycle P.3

Finishing up the Walk Cycle. Here we fill in the minute details and explore the principle of Secondary Action.

Join to leave a comment.

6 comments
Eduardo Araya
Eduardo Araya
March 23rd, 2017

Hello, excellent work, thank you for answering my previous doubts. Today I would like to ask, if after the final rendering of the character, some modification is made to the skeleton (Armature), since in the downloadable file I saw a rigging similar to glasses on the eyes, one circular over the nose and also in the mouth. If so, where could you find a reference on how to do this. Will there be something similar in the cloud ?. Thank you.

Dillon Gu
Dillon Gu
May 1st, 2017

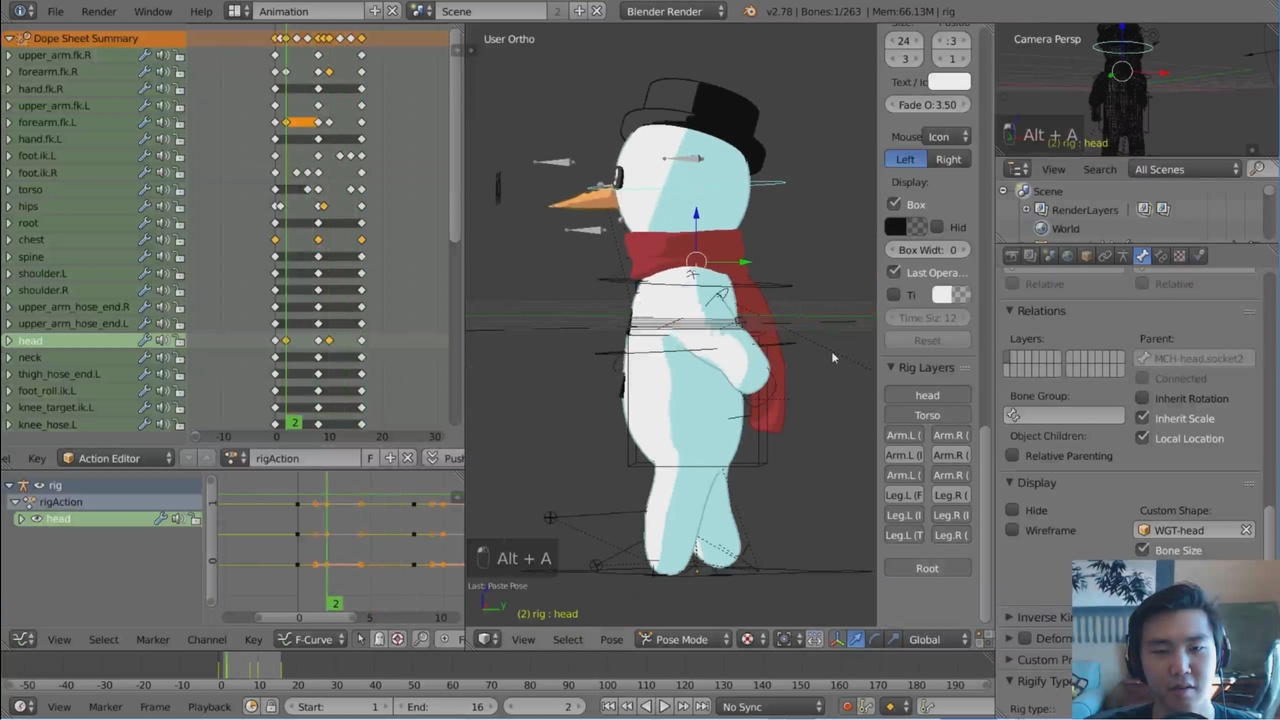
@arayabarrioseduardo: Yes! I didn't cover it because it's based on personal preference, but if you want custom bone shapes (like the glasses), simply follow these steps!

Create a separate mesh with the shape you want (i.e. glasses for eyes). Name this something like B_Shape or B_Glasses for organization. Select the bone you want to replace with the shape in pose mode. Go to the bone options tab (looks like a bone) and scroll down to "Display" and under "Custom Shape" select the name of the mesh you just made. Check the Wireframe option just to the left of that.

And that's it! You can adjust the shape of the custom bone shape to fit the rotation, scale and position of where you want the handle to be by selecting the mesh and making those changes in EDIT mode. Ultimately, it's nothing more than a visual aid for your cursor to grab and see more easily. Hope this helps!

  • Dillon
Cristel Knohr
Cristel Knohr
March 8th, 2017

Well, this is a very good tutorial Dillon. I really learn too much from you. For a young person as you are, you probe to be a great teacher.

Dillon Gu
Dillon Gu
May 1st, 2017

@cristknohr: I'm so glad you like it :)

Neil Jenkinson
Neil Jenkinson
Jan. 27th, 2017

Hi Dillon, Just to let you know thoroughly enjoyed your tutorial and thought I'd have a go. You can see my basic walk cycle at the link.

www.youtube.com/watch?v=ruBSAX9qx-s

Dillon Gu
Dillon Gu
May 1st, 2017

@Daddios: The walk cycle looks great :D Archibald looks super cute, excellent job!

Films Projects Training Blog Blender Studio for Teams
Pipeline and Tools
  • CloudRig
  • Blender Kitsu
  • Brushstroke Tools Add-on
  • Blender Studio Extensions
Characters
  • Mikassa
  • Whale
  • Ballan Wrasse
  • Snow
Studio
  • Terms & Conditions
  • Privacy Policy
  • Contact
  • Remixing Music
Blender Studio

The creators who share.

Artistic freedom starts with Blender The Free and Open Source 3D Creation Suite