Appearance
Pipeline Setup
Work in Progress
15 Oct. 2023 - The content of this page is currently being edited/updated.
Introduction
In this guide, you will learn how to setup and use the Blender Studio Pipeline, the backbone of Blender Open Movies. This workflow relies on Blender, some Blender Add-Ons, and additional services like Kitsu and Flamenco. Wether you are an individual with a single computer or a studio with a full network of workstations, this guide offers a straightforward approach to set up and use the pipeline, complete with easy-to-follow examples.
Clone Repository
The Blender Studio Pipeline git repository contains many tools and resources used in deploying and managing a Blender Studio Pipeline. To start our pipeline we will need to clone this repository.
bash
cd /data # This directory is the root storage that will contain all projects
git lfs install # Ensure git-lfs is installed
git clone https://projects.blender.org/studio/blender-studio-pipeline.git
Generate Folder Structure
The first step in deploying the Blender Studio Pipeline is to create the correct folder structure. Many of the tools used in the Blender Studio require the following folder structure on each of your studio workstations.
- Create project root directory
bash
mkdir /data/my_project- Navigate to the project-tools folder
bash
cd /data/blender-studio-pipeline/scripts/project-tools- Create base folder structure using
bash
./init_project_folder_structure.py /data/my_projectThis will create the bones of your production's directories.
localThis is where the local copy of Blender and the add-ons will be installed.sharedThis is the folder that should be shared over the network.svnThis the versioned controlled folder where the.blendproduction files will live.
- Create render directory
bash
mkdir /data/my_project/render/This directory is used for the temporary storage of render files generated by Flamenco. This storage must be accessible by all computers using Flamenco for rendering, commonly this is a Network Attached Storage of some kind. In this guide, our renders will live in the root of our project directory.
Work in Progress
15 Oct. 2023 - The following folder trees are out of data, and will soon be updated.
Populating shared
This is the folder that should be shared over the network. (By using Syncthing, NFS shares, Samba, Dropbox, etc) Connect this folder to your sharing software of choice and create the following folder structure.
bash
.
├── bts # Behind the scenes
├── concepts # Concept art and paintings
├── development # Piches and boards
├── edit # VSE Editing sequences/exports
├── inspiration # Various inspirations & references
├── music
├── planning
├── pr
├── resources
├── script # Latest scripts for the movie
├── shot_packs # Shots for sharing online
├── training # Training produced for the production
└── videoref # Video shoots from animators
Populating SVN
This is the folder that should contain a version controlled file system to be shared over the network. (By using SVN, GIT-LFS, etc) Connect this folder to your version control software of choice and create the following folder structure.
bash
.
├── config
│   └── asset_pipeline_config
├── previz # Anything related to early development or pre-production tests
└── pro # All files from the production
    ├── promo # Promotional material. Often created near the end of production
    ├── animation_test # For pre-production
    ├── shot_builder # Studio tool configs
    ├── lib # All assets from the production
    │   ├── brushes
    │   ├── cam # Camera rig & setup
    │   ├── char # Characters & character variations
    │   ├── env # Environment asset libraries
    │   ├── fx # Effects
    │   ├── lgt # Lighting setups
    │   ├── maps # General textures and HDRIs
    │   ├── matlib # Materials
    │   ├── nodes # General Node groups
    │   ├── poselib # Pose libraries for animation
    │   ├── props
    │   ├── scripts
    │   └── sets
    └── shots #Structured into sequences
Kitsu Server Setup
Kitsu is a project management software used by the Blender Studio for task management. The server is used to assign tasks to artists, as well as a track each shot as it moves through production The Kitsu server is required for automatically building shots.
- Follow the Official setup instructions for Kitsu Server
- Upon entering the Kitsu web interface follow the first production guide
Blender Setup
The next step is to deploy the required software onto each of the studio's workstations.
- Download the latest Blender
bash
cd /data/my_project/svn/tools
./update_blender.py
This will download the latest blender to /data/my_project/local/blender
Install Blender Add-Ons
- Download required Add-Ons
bash
mkdir /data/my_project/shared/artifacts/addons
cd /data/blender-studio-pipeline/scripts/pipeline-release
./package_local.py /data/my_project/shared/artifacts/addons
Setup Blender Add-Ons
- Follow the below instructions to correctly set the preferences of each Add-On
Blender Kitsu Add-On Preferences
- Open Blender and Select
Edit>Preferences>Add-Ons - Search the 'Blender Kitsu' and use the checkbox to Enable the Add-On
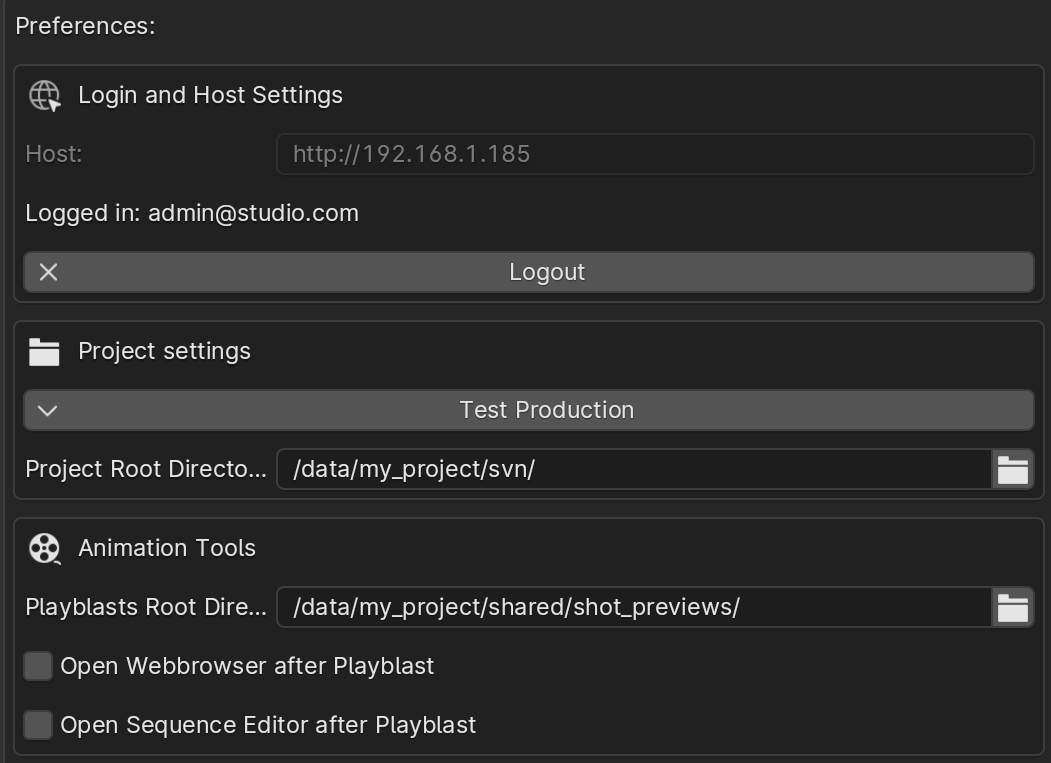
- Set the following settings in the add-on preferences
- Login
- Host:
{my_kitsu_server_url}Set during Kitsu Server Setup - Username:
{username@studio.org} - Password:
{user_password}
- Host:
- Project Settings
- Select Production: Choose the current Production
- Project Root Directory:
/data/my_project/svn
- Animation Tools
- Playblast directory:
/data/my_project/shared/shot_previews/
- Playblast directory:
- Login
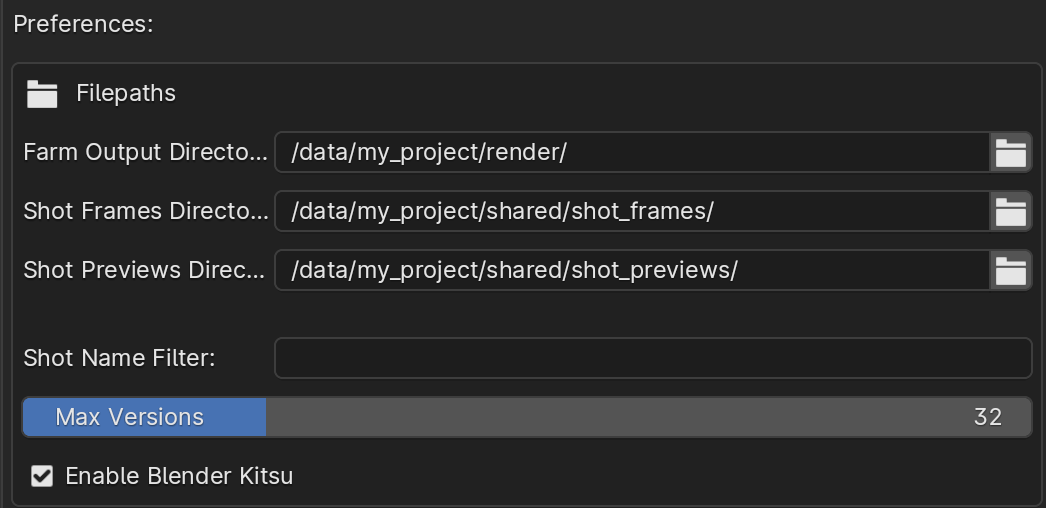
Render Review Add-On Preferences
- Open Blender and Select
Edit>Preferences>Add-Ons - Search the 'Render Review' and use the checkbox to Enable the Add-On
- Set the following settings in the add-on preferences
- Ensure
Enable Blender Kitsuis Enabled - Render Farm:
/data/my_project/render/ - Shot Frames:
/data/my_project/shared/shot_frames/ - Shot Previews:
/data/my_project/shared/shot_previews/
- Ensure
Flamenco Setup
- Create Flamenco shared storage directory
bash
mkdir /data/flamenco_storage- Follow the instructions at https://flamenco.blender.org/usage/quickstart/ to setup Flamenco
- During Flamenco Manager Setup use
/data/flamenco_storageas the shared storage directory - During Flamenco Manager Setup use
/data/my_project/local/blender/{os}/blenderas the Blender Executable Path