Blender Kitsu
blender-kitsu is an add-on to interact with Kitsu from within Blender. It also has features that are not directly related to Kitsu but support certain aspects of the Blender Studio Pipeline. Blender-Kitsu blogpost
How to get started
After installing you need to setup the add-on preferences to fit your environment. In order to be able to log in to Kitsu you need a server that runs the Kitsu production management suite. Information on how to set up Kitsu can be found here.
If Kitsu is up and running and you can successfully log in via the web interface you have to setup the addon preferences.
NOTE: If you want to get started quickly you only need to setup login data and active project
Setup Login Data
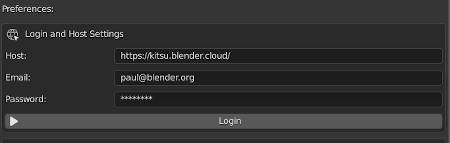
Host: The web address of your kitsu server (e.g., https://kitsu.mydomain.com)
Email: The email you use to log in to kitsu
Password: The password you use to log in to kitsu
Press the login button. If the login was successful, the next step is..
Setup Project Settings

Project Root Directory: Path to the root of your project. Will later be used to configure the addon on a per project basis
Setup Animation Tools

Playblast Root Directory: Path to a directory in which playblasts will be saved to
Open Web browser after Playblast: Open default browser after playblast which points to shot on kitsu
Open Video Sequence Editor after Playblast: Open a new scene with Sequence Editor and playback playblast after playblast creation
Setup Lookdev Tools

Render Presets Directory: Path to a directory in which you can save .py files that will be displayed in render preset dropdown. More info in: How to use render presets.
Setup Media Search Paths
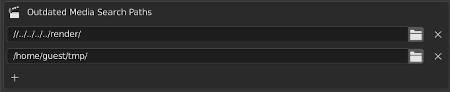
Path List: List of paths to top level directory. Only media that is a child (recursive) of one of these directories will be scanned for outdated media.
Setup Miscellaneous
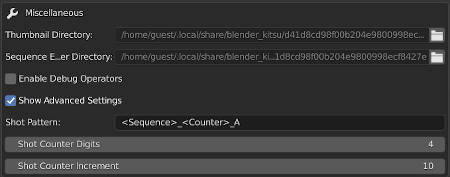
Thumbnail Directory: Directory where thumbnails will be saved before uploading them to kitsu. Cannot be edited.
Sequence Editor Render Directory: Directory where sequence editor renderings will be saved before uploading them to kitsu. Cannot be edited
Enable Debug Operators: Enables extra debug operators in the sequence editors Kitsu tab.
Advanced Settings: Advanced settings that changes how certain operators work.
After setting up the addon preferences you can make use of all the features of blender-kitsu
Features
blender-kitsu has many feature and in this documentation they are divided in different sections.
Sequence Editor
blender-kitsu sequence editor tools were constructed with the idea in mind to have a relationship between sequence strips and shots on Kitsu. This connection enables the exchange of metadata between the edit and the shots on Kitsu. Some examples are frame ranges of shots can be directly updated from the edit or thumbnails can be rendered and uploaded to Kitsu with a click of a button and many more which you will find out in this section:
Metadata Strips
Metadata Strips are regular Movie Strips that can be linked to a shot in kitsu. It is a good idea to create a separate metadata strip in a separate channel that represents the shot. That gives you the freedom to assemble a shot out of multiple elements, like multiple storyboard pictures, and still have one metadata strip that contains the full shot range.
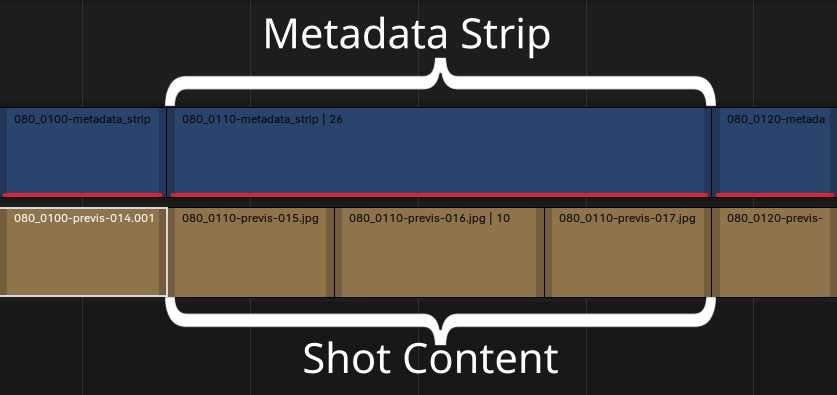
Good to know: A metadata strip can have 3 states. It can be initialized but not linked yet. That means the movie strips knows I am a metadata strip but I don't have a relationship to a shot on Kitsu yet. It can be linked, which means the strip is already initialized and is linked to a sequence_id and shot_id on Kitsu. Only if a strip is linked you can exchange metadata, push thumbnails etc. The last state is uninitialized which basically means it's a regular movie strips and has nothing to do with kitsu.
Create a Metadata Strip
- Select a sequence strip for which you want to create a metadata strip and execute the
Create Metadata Stripoperator. This will create a blank movie strip. The metadata strip will be placed one channel above the selected strips. Make sure there is enough space otherwise the metadata strip will not be created.
Initialize a Shot
Select a metadata strip and open the
Kitsutab in the sidebar of the sequence editor. You will find multiple ways on how to initialize your strip.
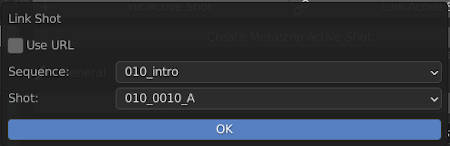
Case A: Shot does already exist on Kitsu
2.1 Execute the
Link Shotoperator and a pop up will appear that lets you select the sequence and the shot to link to2.2 Alternatively you can also link a shot by pasting the URL. (e.G: https://kitsu.yourdomain.com/productions/fc77c0b9-bb76-41c3-b843-c9b156f9b3ec/shots/e7e6be02-5574-4764-9077-965d57b1ec12)
Case B: Shot does not exist on Kitsu yet
3.1 Execute the
Initialize ShotOperator.3.2 Link this strip to a sequence with the
Link Sequenceoperator or create a new sequence with theSubmit New Sequenceoperator.3.3 Type in the name of the new shot in the
Shotfield3.4 Execute the
Submit New Shotoperator in thePushPanel (Will warn you if the shot already exists on Kitsu). This operator can optionally populate each 'Shot' with a task set to the project's default task status.
Note: Most of the operator are selection sensitive. So you can do these operations for a batch of sequence strips. If you have nothing selected it will usually try to operate on all strips in the sequence editor.
Metadata
If you select a single linked strip you will see a Metadata panel that shows you the information that is related to the sequence and shot the strip is linking to.
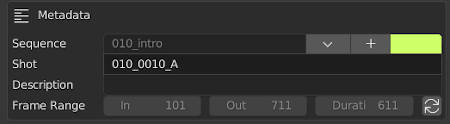
The frame range will be updated by using the Blender editing tools on the strip. (trimming, sliding, etc.).
If you execute the Initialize Shot Start Frame operator (refresh icon) the current in point of the strip will be remapped so the shot starts at 101 in the current editing state.
You can reassign the shot to another sequence by executing the Link Sequence Operator, change the shot name or the sequence color.
If you linked in a sequence that has no ["data"]["color"] attribute on Kitsu yet the gpu overlay line will be white. In order to add a new sequence color execute the Add Sequence Color operator.

All this information and more can be pushed to kitsu which bring us to the next panel.
Missing Metadata Strip Media
If your scene contains any metadata strips that have "missing media" a Fix Metadata Strips box will appear in your Kitsu Panel. Simply select the metadata strips that have missing media, or none to fix all strips, and run the Fix Missing Media operator.

Push
In the Push panel you will find all the operators that push data to Kitsu.
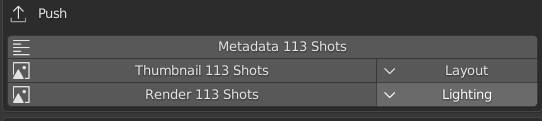
Metadata: Pushes metadata of shot: sequence, shot name, frame range, sequence_color
Note: Global edit frame range will be saved in
"frame_in""frame_out"kitsu shot attribute
The actual shot frame range (starting at 101) will be saved in["data"]["3d_start"]kitsu shot attribute
Thumbnails: Renders a thumbnail of the selected shots (will be saved to the
Thumbnail Directory-> see addon preferences) and uploads it to Kitsu. Thumbnails are linked to a task in Kitsu. So you can select the Task Type for which you want to upload the thumbnail with theSet Thumbnail Task Typeoperator.
If you select multiple metadata strips it will always use the middle frame to create the thumbnail. If you have only one selected it will use the frame which is under the cursor (it curser is inside shot range).
Render: Renders the shot range out of the sequence editor, saves it to disk and uploads it to Kitsu. Works very similar to thePush Thumbnailoperator.
Pull
In the Pull panel you will find all the operators that pull data from Kitsu to a metadata strip.

Metadata: Pulls metadata of shot: sequence, shot name, shot description and updates the strip name to match the shot name.
Note: Frame ranges will never be updated when pulling data from Kitsu. They belong to the edit and will only be pushed to Kitsu.
If you have not sequence selected the Pull Entire Edit Operator will appear in the Pull panel.
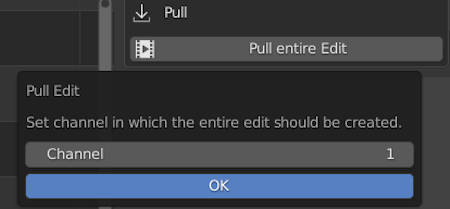
After you selected the channel it will go through all shots on Kitsu, create a metadata strip which will be linked to the respective shot and pulls all metadata.
It will use te frame_in and frame_out attribute on Kitsu to determine the in and out points in the edit. So make sure these are up to date and don't overlap.
As a result a bigger edit with nice sequence_colors can look pretty cool:

Multi Edit Metadata
The Multi Edit Metadata panel only appears when you select multiple metadata strips that are all initialized but not linked yet.
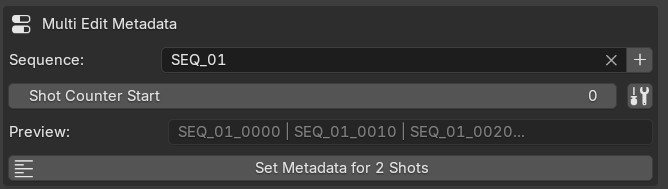
It is meant to be way to quickly setup lots of shots if they don't exist on Kitsu yet. You specify the sequence all shots should belong to and adjust the Shot Counter Start value. In the preview property you can see how all shots will be named when you execute the Multi Edit Strip operator.
Advanced Settings
If you enable the Advanced mode (via the screwdriver/wrench icon) next to the counter value, you have access to advance settings to customize the operator even more.

You can adjust the number of counter digits, the increment size and also the Pattern it will use to generate the shot name.
Pattern: supports 3 wildcards.
<Sequence>,<Counter>,<Project>,Episodethat can be used multiple times in any order.
Custom Sequence Variable: specify a custom string that should be used in the<Sequence>wildcard instead of the sequence name.
Custom Project Variable: specify a custom string that should be used in the<Project>wildcard instead of the project name.
Import Media
A collection of operators to Import media based on the Shot associated with the selected metadata strip(s).
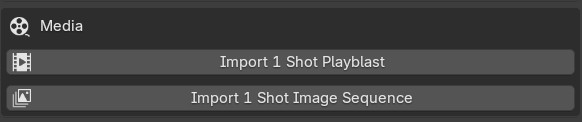
Import Playblast
With a metadata strip selected Import Playblast Operator will find an image sequence of a given task type located in the Frames Root directory. 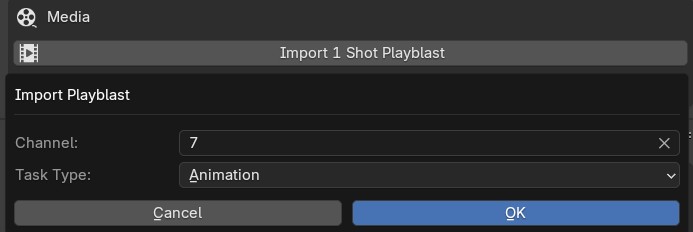
Use this operator to import image sequences that have been approved via the Render Review system. Image Sequences can be loaded as either EXR or JPG sequences.
Import Image Sequence
With a metadata strip selected Import Image Sequence Operator will find an image sequence of a given task type located in the Frames Root directory. 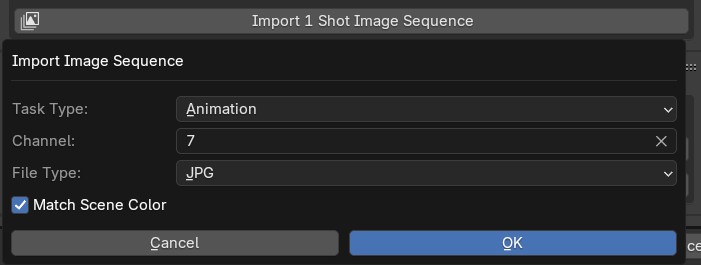
Use this operator to import image sequences that have been approved via the Render Review system. Image Sequences can be loaded as either EXR or JPG sequences.
General Sequence Editor Tools
In the general tab you can find some tools that don't directly relate to Kitsu but are useful for editing.

Scan for outdated media will scan the selected / all sequence strips for their source media file. It searches for a later version in either the Playblast directory or the "Media Update Search Paths" directories (set in the add-on preferences). If the current media file is outdated it will highlight that strip with a red line in the sequence editor:

To update the outdated strips you can select them individually and by clicking the Arrow Up or Arrow Down you cycle through the available versions on disk. You will be prompted with an information if you reached the latest or oldest version.

Note: The operator searches for a version string e.G
v001and checks files that are named the same but have a different version.
Context
blender-kitsu context features were constructed with the idea in mind to create a relationship between a certain task on Kitsu and a blend file.
To create 'context' you can find the Context Browser in the Kitsu panel in the sidebar of the 3D Viewport.
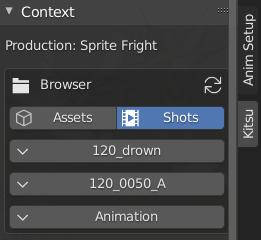
By selecting the different drop down menus you can browse through the Kitsu file structure and set e.G the active sequence, active shot and task type you want to work on.
The Detect Context operator tries to look at the filepath of the blend file and figure out the context automatically.
Depending on which Task Type you select different tool sets will be available.
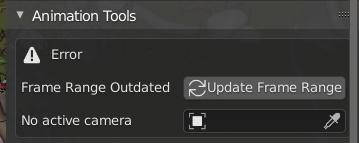
Animation Tools
The animation tools will show up when you selected a Task Type with the name Animation.

Create Playblast: Will create a openGL viewport render of the viewport from which the operator was executed and uploads it to Kitsu. The
+button increments the version of the playblast. If you would override an older version you will see a warning before the filepath. Thedirectorybutton will open a file browser in the playblast directory. The playblast will be uploaded to theAnimationTask Type of the active shot that was set in theContext Browser. The web browser will be opened after the playblast and should point to the respective shot on Kitsu. By default Metadata will be burned into the playblast file, to disable this enableManual Playblast Burn-Insin Add-On preferences.
Push Frame Start: Will Push the current scene's frame start to Kitsu. This will set the['data']['3d_start]attribute of the Kitsu shot. Pull Frame Range: Will pull the frame range of the active shot from Kitsu and apply it to the scene. It will use read['data']['3d_start]attribute of the Kitsu shot.
Update Output Collection: Blender Studio Pipeline specific operator.
Duplicate Collection: Blender Studio Pipeline specific operator.
Check Action Names: Blender Studio Pipeline specific operator.
Backup Disk Versions
In the Advanced Settings section of the Add-On Preferences, you'll find the Use Version Control option. When disabled (default), Blender will automatically save a backup .blend1 file to a folder called version_backups each time you:
- Create a Playblast (via
Create Playblastoperator) - Manually save a backup version (via
Save Backup Versionoperator)
Folder Structure
When using Backup Disk Versions, your project structure will look like this:
shots/
└── SQ01/
│ └── SH01/
│     ├── SH01-anim.blend  (main file)
│     └── version_backups/
│         ├── SH01-anim-v001.blend1
│         ├── SH01-anim-v002.blend1
│         ├── SH01-anim-v002_001.blend1
│         ├── SH01-anim-v003.blend1
│         └── ...
Create Playblast - Creates a viewport render and uploads to Kitsu
- Automatically saves a backup of the current version (unless
Use Version Controlis enabled) - The backup is named using your current playblast version (e.g.,
SH01-anim-v004.blend1when playblast version isv004)
Save Incremental Backup - Manually save a backup without creating a playblast
- Creates an incremental version (e.g., if the latest is
v004, this createsv004_001)
Open Backups Folder - Opens the version_backups folder in your system file browser
- Quick access to browse and manage your backup files
Backups need to be manually restored.
Lookdev Tools
The lookdev tools will show up when you selected a Task Type with the name Lighting | Rendering | Compositing.
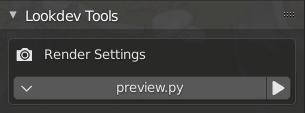
Apply Render Preset: Consists of a dropdown menu that displays all
.pyfiles which are present in theRender Presets Directory(defined in the add-on preferences). Select the.pyfile you want to execute. When you hit thePlaybutton themain()function of the python file will be executed. Very useful to quickly switch between different render settings.
Error System
blender-kitsu has different checks that are performed during file load or during editing. If it detects an error that prevents other operators to run it will display an error in the ui.
Shot Builder
Shot Builder is a Feature of the Blender Kitsu Add-on To automatically build shot files, using the data from Kitsu server and the file structures defined on the Blender Studio website.
Features
- Saves a 'Shot' File for each of the Shot's Task Types on Kitsu Server.
- Automatically Names Scenes based on Shot and Task Type names
- Creates output collections for certain Task Types (anim, fx, layout, lighting, previz, storyboard)
- Links output collections between Task Types based on Shot Assembly specifications
- Loads Editorial Export (defined in preferences) into Shot file's VSE area (if available)
- Loads Assets via
asset_index.jsonfile stored atyour_production/svn/pro/assets/asset_index.json - Executes a
hook.pyfile stored atyour_production/svn/pro/assets/shot-builder/hooks.py
Getting Started
Shot Setup
The Shot Builder requires shot data including Name, Frame Rate, and Duration to be stored on a Kitsu Server. Please follow the Sequence Editor guide to create metadata strips and Push that data to the Kitsu server or follow the Kitsu First Production to manually enter this data into the Kitsu Server.
Asset Setup
Kitsu Server
Assets needs to be associated with each shot in your production. Please follow the Kitsu Breakdown guide to Cast your assets to shots.
Assets
To match Assets File to the casting breakdown on the Kitsu server, we need to tag the Asset with a filepath and collection. This can be done via the Blender Kitsu Add-On. This data will be used to match a Kitsu Asset with a Collection within a .blend file, that will be linked into all shots that have that Asset "casted in it".
- Open the file for a given Asset.
- Under the Kitsu>Context Panel, check the following settings.
- Type is set to Asset.
- Asset Type is set to the correct Asset Type (Collection, Prop, etc)
- Asset Field is set to the matching entry on the Kitsu server for the current file.
- Under the Kitsu>Context>Set Asset sub-panel...
- Collecton is set to the Asset's parent collection.
- Run the Set Kitsu Asset operator to send the current filepath and selected collection to the Kitsu Server.
You should now see the filepath and collection under the Asset's Metadata on the Kitsu Server.
Hooks Setup
Shot Builder uses hooks to extend the functionality of the shot builder. To create a hook file
- Open
Edit>Preferences>Add-Ons - Search for the
Blender KitsuAdd-On - In the
Blender KitsuAdd-On preferences find theShot Buildersection - Run the Operator
Save Shot Builder Hook File - Edit the file
your_project_name/svn/pro/config/shot_builder/hooks.pyto customize your hooks.
Arguments to use in hooks
    scene: bpy.types.Scene # current scene
    shot: Shot class from blender_kitsu.types.py
    prod_path: str # path to production root dir (your_project/svn/)
    shot_path: str # path to shot file (your_project/svn/pro/shots/{sequence_name}/{shot_name}/{shot_task_name}.blend)

Notes
     matching_task_type = ['anim', 'lighting', 'fx', 'comp'] # either use list or just one string
     output_col_name = shot.get_output_collection_name(task_type_short_name="anim")
Editorial Exports
Shot Builder can load Exports from Editorial to the .blend's VSE for reference.
- Open
Edit>Preferences>Add-Ons - Search for the
Blender KitsuAdd-On - In the
Blender KitsuAdd-On preferences find theShot Buildersection - Set your
Editorial Export Directorytoyour_project/shared/editorial/export/ - Set your
Editorial File Patterntoyour_project-edit-v###.mp4where#represents a digit. This pattern matches a file namedyour_project-edit-v001.mp4.
Run Shot Builder
- Open Blender
- Select File>New
- From dialogue box, select the desired Sequence/Shot/Task Type
- Hit
okto run the tool. The tool will create a new file in the directoryyour_project/svn/pro/shots/{sequence_name}/{shot_name}/{shot_name}+{task_type_name}.blend
Templates
Template files are used to implement custom UI when building new shots. Templates are custom .blend files named after the corresponding task type on the Kitsu Server for a given project. Workspaces from the template files are loaded into newly built shot files.
- Save a new .blend file in the directory
your_project_name/svn/pro/config/shot_builder/templates - Name the .blend file after a task type in Kitsu (e.g. Animation, Layout, Compositing), name must match exactly the task type name on Kitsu Server.
- Customize Workspaces to create custom UI for the task type, and save the file.
Template files are only used for custom UI, other data like scene settings, collections and objects will not be loaded.
Settings
Settings.json file can be created by navigating to add-on preferences and running the "Save Shot Builder Settings File" operator. This will save hook files at your_project_name/svn/pro/config/shot_builder directory.
Settings file controls core features of the shot builder on a task type basis.
Features
OUTPUT_COL_CREATEdecide to create an output collection for a given task type.OUTPUT_COL_LINK_MAPPINGcontrols which output collections are linked into which shot files. (e.g. link animation output collection into lighting file)LOAD_EDITORIAL_REFcontrols if the editorial export is imported into a given shot fileASSET_TYPE_TO_OVERRIDEcollections matching these prefixes will be created with override if true
{
    "OUTPUT_COL_CREATE": {
        "anim": true,
        "comp": false,
        "fx": true,
        "layout": true,
        "lighting": false,
        "previz": true,
        "rendering": false,
        "smear_to_mesh": false,
        "storyboard": true
    },
    "OUTPUT_COL_LINK_MAPPING": {
        "anim": null,
        "comp": [
            "anim",
            "fx"
        ],
        "fx": [
            "anim"
        ],
        "layout": null,
        "lighting": [
            "anim"
        ],
        "previz": null,
        "rendering": null,
        "smear_to_mesh": null,
        "storyboard": null
    },
    "LOAD_EDITORIAL_REF": {
        "anim": true,
        "comp": false,
        "fx": false,
        "layout": true,
        "lighting": false,
        "previz": false,
        "rendering": false,
        "smear_to_mesh": false,
        "storyboard": false
    },
    "ASSET_TYPE_TO_OVERRIDE": {
        "CH": true,
        "PR": true,
        "LI": true,
        "SE": false,
        "LG": true,
        "CA": true
    }
}
Render Review
This is a set of features to review renders from Flamenco with the Sequence Editor.
Before you get started
Render review requires a specific folder structure of the rendering pipeline. This structure is defined by Flamenco. You can find a quickstart guide for Flamenco here.
Features
- Quickly load all versions of a shot or a whole sequence that was rendered with Flamenco in to the Sequence Editor
- Inspect EXR's of selected sequence strip with one click
- Approve render which copies data from the farm_output to the shot_frames folder
- Push a render to the edit which uses the existing .mp4 preview or creates it with ffmpeg and copies it over to the shot_preview folder with automatic versioning incrementation
- Creation of metadata.json files on approving renders and pushing renders to edit to keep track where a file came from
- Load Sequences without Kitsu server when no project is set in Blender Kitsu Add-On
Development
Update Dependencies
To update the dependencies of Blender_Kitsu please follow these steps.
cd scripts-blender/addons/blender_kitsu/wheelsTo enter the directory of dependant modulesrm -r *.whlTo remove any existing packages (or manually remove .whl files if you are on windows)pip download gazuto get the latest gazu and it's dependencies as wheelsrm certifi* charset_normalizer* idna* requests* urllib3* websocket_client*to remove the modules that are already included in blender
Troubleshoot
blender-kitsu makes good use of logging and status reports. Most of the operators report information in the blender info bar. More detailed logs can be found in the blender system console. If you feel like anything went wrong, consider opening a console and check the logs.
Credits
- This project uses gazu to interact with the gazu database. Gazu is written by CGWire.
- /sqe/draw.py originally by Sybran A. Stüvel.