Pose Shape Keys
This extension enables a workflow where you can continue iterating on your vertex weights and bone constraints after you've already created your shape keys, without having to re-sculpt those shape keys.
You can find a video tutorial and more detailed explanation of how it works here.
Workflow Example:
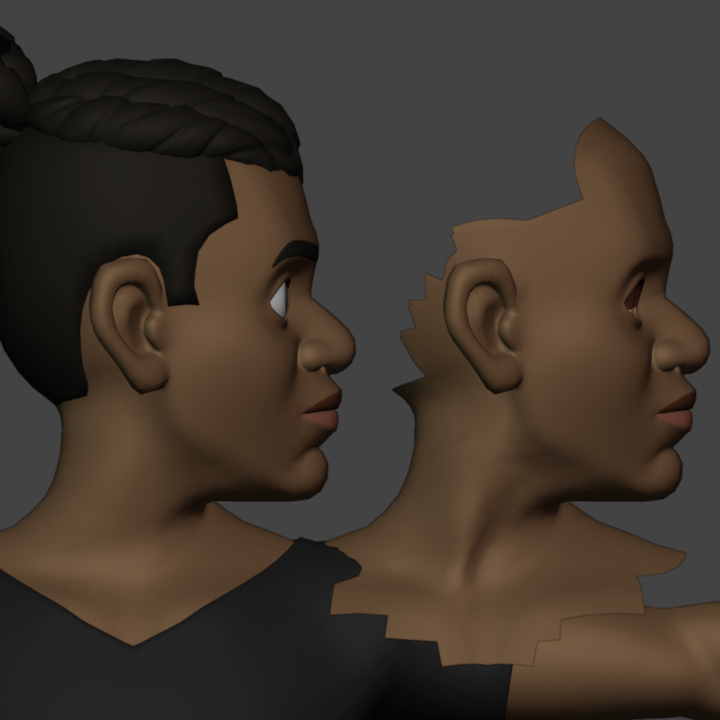
The most easy to understand use case for the add-on involves the workflow of adding corrective shape keys to a character rig which so far uses only bones for its deformation. Let's say we want to add the neck muscle that appears when humans look pretty far to the left or right.
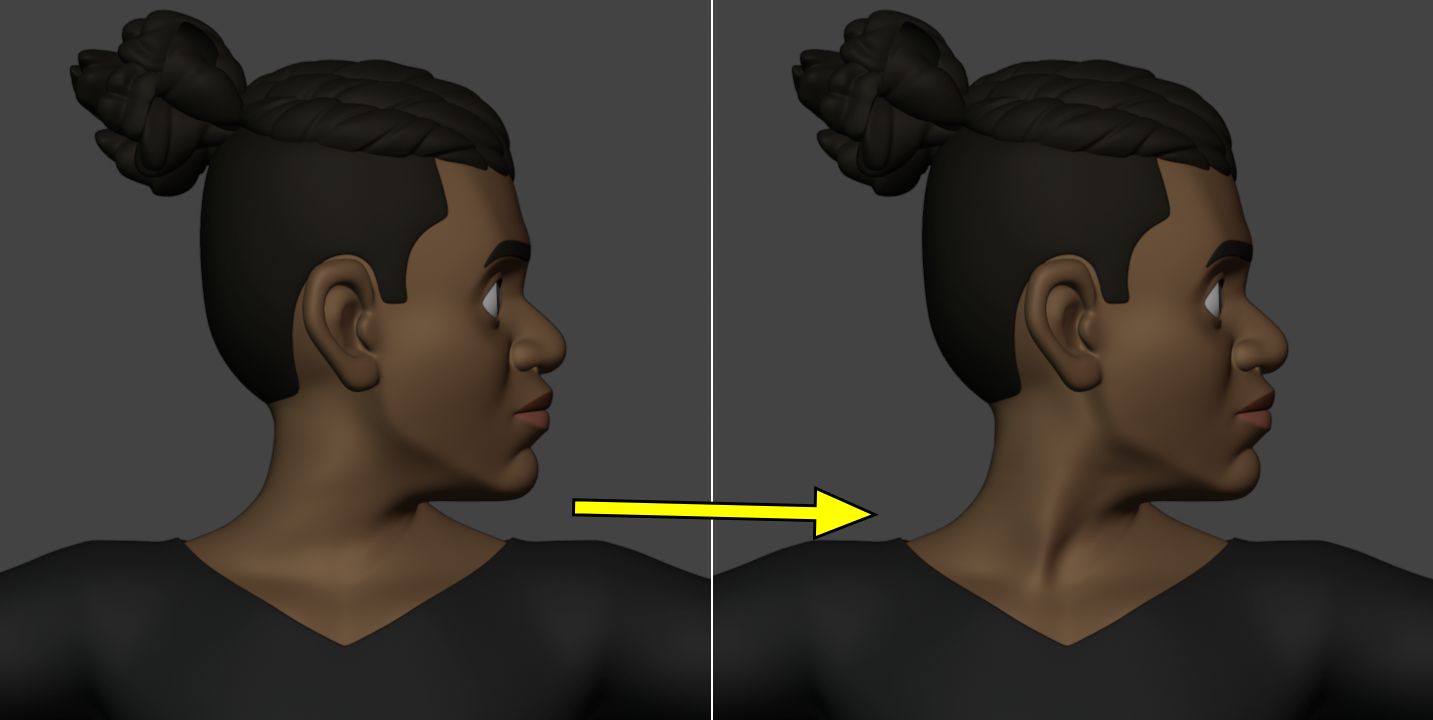
- Create this pose by rotating the rig's head bone, then keyframing it, let's say at frame 10. I will also key the default pose at frame 1.
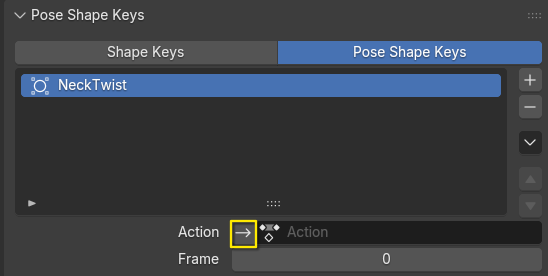
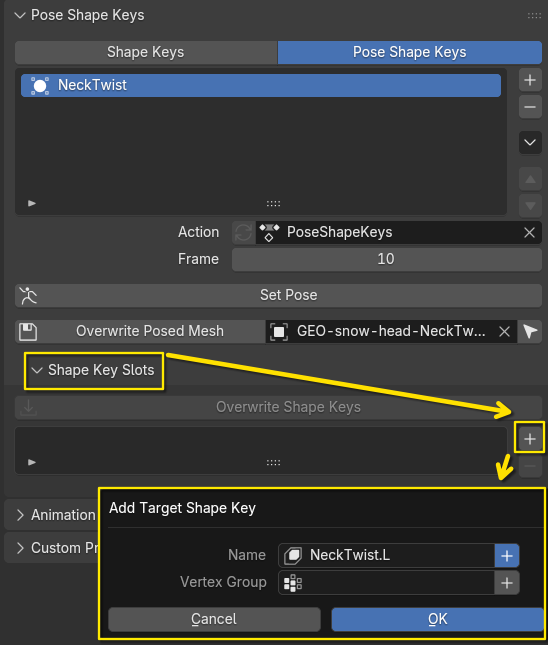
- Go back to object mode, select the mesh, go to the Pose Shape Keys UI, and add a new entry. I named it "NeckTwist".
- A Pose Shape Key needs to associate a pose with a shape, which is why you find an Action selector and a frame number here. You can specify them manually, but there's a convenience button to just assign the current action and current frame number.
- Click "Save Posed Mesh". This will create a copy of your mesh with deformations applied and modifiers removed.
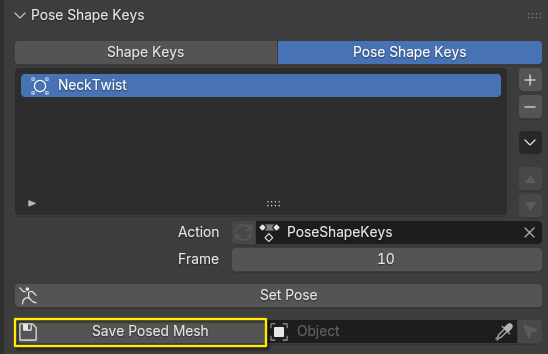
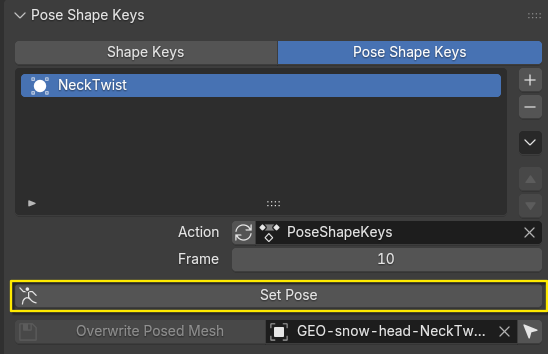
- Note that this button is only available if the previously specified Action is assigned, and the playhead is at the specified frame number. If the button is grayed out because these conditions are not met, you can hit "Set Pose".
- Select and sculpt this mesh into the desired shape.
- Go back to the deformed mesh, and let's create some actual shape keys. Here we could specify a mask vertex group, but for this specific case, we don't need one.
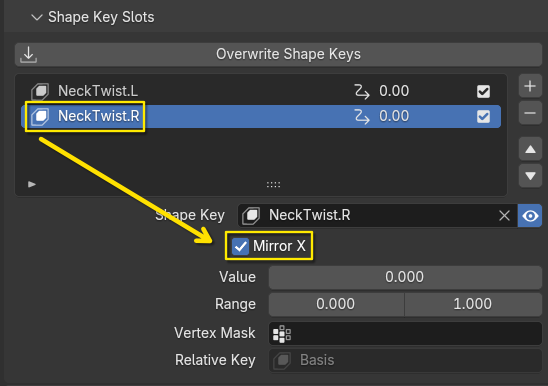
- I've created two shape keys: "NeckTwist.L" and "NeckTwist.R" for looking to the left and right respectively. Since we sculpted the shape where the character is looking left, we need to enable "Mirror X" on the right-side shape.
- We need to create a driver that activates these shape keys when the head is rotated. To help get started with that, we can try our luck with the "Auto-initialize Driver" button. This will show a pop-up of whatever transforms were detected in the current pose.
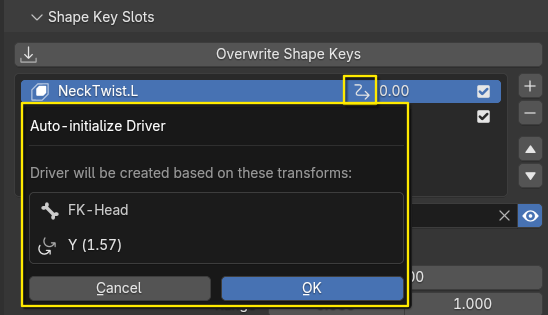
- Clicking "OK" will create a driver based on the current bone transformations. In this example, it's showing only a Y axis rotation of the Head bone by a value of 1.57, which is half of pi, which is 90 degrees, which sounds correct.
- For the right-side however, the system is not smart enough to know that we want to invert the value. We can repeat the above step, but then we need to make a manual adjustment by right-clicking the value and then choosing "Edit Driver".

- We just need to make sure this driver activates when the head is rotated negative 90 degrees instead of positive 90 degrees. So, just add a minus sign in the expression.

- You can test the drivers are working correctly by rotating the head.
- It's time to press "Overwrite Shape Keys". This will push the shape from the sculpted object into both shape keys in our list, mirroring it for the right side because of the "Mirror X" checkbox we've enabled earlier.

- We are done!
- It may not seem like much, but we've authored two shape keys at the same time, and established a highly non-destructive workflow:
- We can continue iterating on the shape on both sides at the same time, by sculpting the extra mesh that was created, then clicking "Overwrite Shape Keys" again.
- We can change the weight painting of the neck, which will initially distort our sculpted shape, but all we have to do is click "Overwrite Shape Keys" again to restore the final deformations.
- The same would be true if this was a corrective shape key which relies on multiple other shape keys already being activated. The workflow for more complex cases is exactly the same.
Other example use cases:
1. Sculpted facial expressions applied directly on top of a bone deformation based rig:
- A character artist can sculpt facial expressions to great quality and detail
- You pose the rig to be as close to this sculpted shape as possible, and create a rig control that blends into this pose using Action Constraints.
- Using the add-on, create corrective shape keys that blend your posed mesh into the shape of the sculpt.
- Hook up those corrective shape keys to the rig via drivers
- You now have the precise result of the sculpted facial expression, while retaining the freedom of bone-based controls that can move, scale and rotate!
2. Author finger correctives 24-at-a-time:
- Create a fist pose where all finger bones (4x2x3=24) are bent by around 90 degrees.
- Create a Pose Key and a storage object, and sculpt the desired deformation result.
- On the rigged mesh, create the 24 shape keys within the PoseKey; One for each section of each finger.
- Assign vertex groups to them that mask the affected areas.
- Normalize the vertex masks using the operator in the Pose Shape Keys list's drop-down menu.
- Now you can push the sculpted fist shape into all 24 shape keys at the same time.
- Create drivers so each shape key is driven by the corresponding finger bone.
- You can now tweak and iterate on the sculpted shape, and update all 24 shape keys by clicking the "Override Shape Keys" button.