Brushstroke Tools
Set of tools for a painterly brushstroke stylization workflow of 3D assets developed by the Blender Studio
You can find a guided workshop on how to use the tools to create a painterly scene go here: https://studio.blender.org/training/stylized-rendering-with-brushstrokes/

Fundamental Concept
The Brushstroke Tools add-on provides a convenient interface, as well as different operators to create, manage and modify 3D brushstroke geometry that is based on the procedural generation of textured mesh strips based on curve geometry using Geometry Nodes.
All brushstroke layers created with the add-on are associated to a surface mesh object.
There are two types of brushstroke layers to provide different modes of interaction:
- Fill
- Draw
One key paradigm of its implementation is that the surface object does not have to be local data for it to work.
User Interface
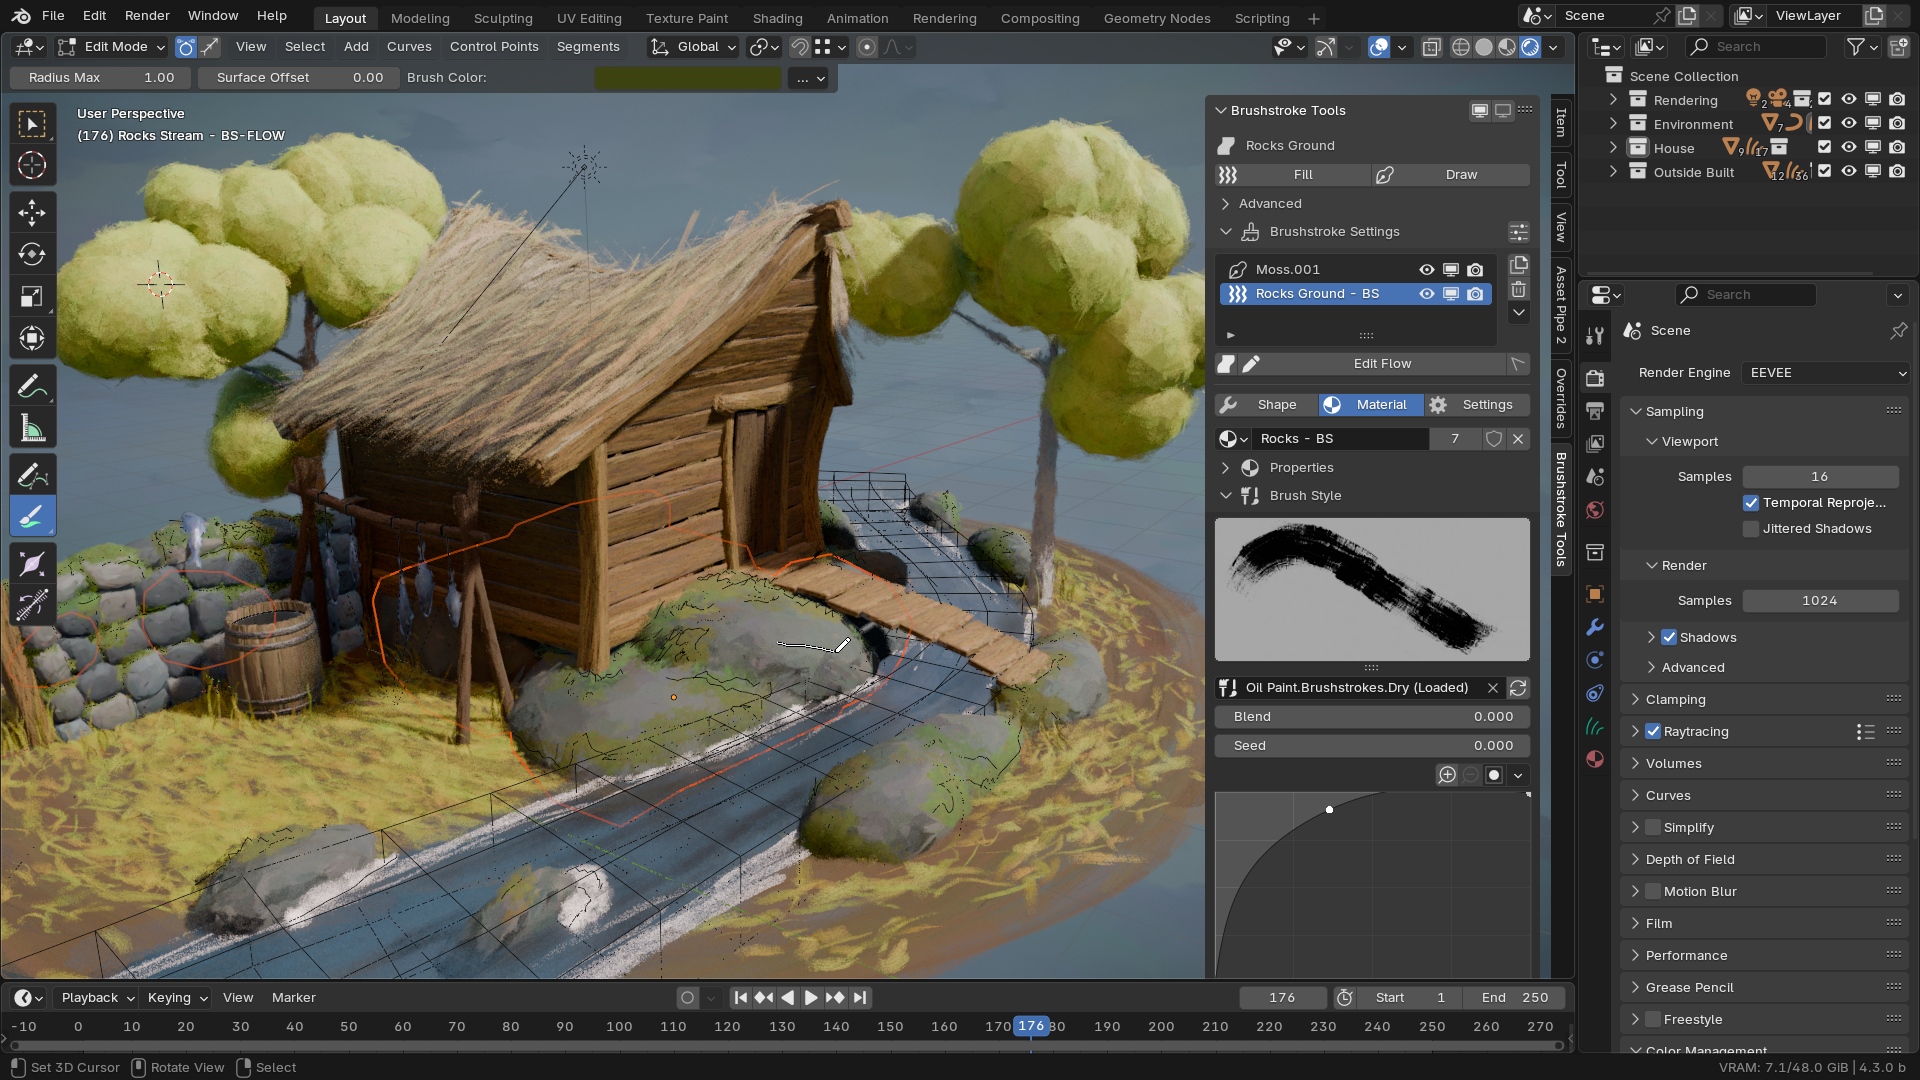
The user interface for the addon can be found in the properties panel on the right side of the 3D viewport in the Brushstroke Tools category.
Context Brushstroke Layers
All associated brushstroke layers that belong to the same brushstroke object show up in a list based on the active context. There are different operators to make changes the active brushstroke layer to the right of the list.
Brushstroke Layer Properties
Below the list of context brushstroke layers you can find the properties of the active brushstroke layer. The properties are split up into three tabs: Shape, material and settings.
In the header of the Brushstroke Settings panel there is a toggle to enable UI options. This temporarily reveals more functionality of the properties and allows to modify the interface.
Shape
The shape panel presents you with a simplified version of the modifier interface of the active brushstroke layer. Here you can adjust procedural parameters of the setup on a brushstroke layer level.
Material
The material panel presents you with a simplified user interface for the brushstroke material. You can select and edit the material that the active brushstroke layer uses and modify it from here.
Material Properties
These are the base settings of the material to define different PBR properties.
Brush Style
The brush style defines which texture is mapped to the individual brushstrokes. There is a selection of oil painting brushes based on real-life scans. The Default brush style is a procedural texture that comes with a set of input settings to modify its look.
The available brush styles are stored in the user preferences and can be reloaded with the refresh button.
Below the brush style selection is a curve to map the texture to the brush opacity for more control.
Effects
Adding more effects is a matter of inserting more nodes in the node-tree and the interface adjusts dynamically.
Settings
The settings panel provides a list of additional settings for the active brushstroke layer.
Deforming Surface
Controls the stable deformation functionality of the Brushstroke Tools add-on for the brushstroke layer.
This toggle can also be used when the surface is linked data. Keep in mind that the add_rest_position_attribute flag needs to be set on the object for this to work.
Animated Strokes (experimental)
Enables the fuctionality to animated the drawn brushstrokes based on the frame they were drawn(similar to Grease Pencil). Turn on auto-keying for this to take effect.
Shadow Visibility
Controls the shadow visibility of the brushstrokes layer.
User Preferences
In the user preferences for the Brushstroke Tools addon you can modify the way resource assets are loaded into the file. Be catious of linking to the default directory though, since links can easily break when moving the file, or sharing it with others.
When changing the resource directory path ({LIB}), you need to provide the resource files in the directory. Use the operator to do so and copy the resource files from the add-on directory to your custom directory.
The default resource directory is relative to the user home directory:
- WINDOWS:
%USERPROFILE%\AppData\Roaming\Blender Studio Tools\Brushstroke Tools\ - MAC:
/Users/$USER/Library/Application Support/Blender Studio Tools/Brushstroke Tools - LINUX:
$HOME/.config/blender_studio_tools/brushstroke_tools
Assets that are provided with the add-on will be automatically overwritten with updates in the default directory when the resource directory is not specified differently. When making changes to these files, specify a custom resource directory to preserve the changes. Additional files that are not part ofthe default add-on files will be kept in place (e.g. installed brush styles).
Brush Styles
Here you see a list of all the available brush styles that have been loaded by the add-on.
Add-on Customization
When choosing an external path for the add-on resources in the user preferences all resources can be customized in place. Currently there are no mechanisms in place to make customization more convenient, so do this at your own risk.
Additional Brush Styles
Installation
Adding existing brush styles to the available ones in the user preferences can be done by simply dropping resources including the .blend file containing the brush styles in the {LIB}/styles/ directory of the addon resources.
Brush styles can be spread out over multiple files in the resource directory. They are identified via the node-group name.
For easy installation you can also use the Install Brush Style Pack operator from the user preferences.
Additional brush styles by the Blender Studio team can for example be found here: https://studio.blender.org/blog/new-custom-brushstroke-styles/
Creation
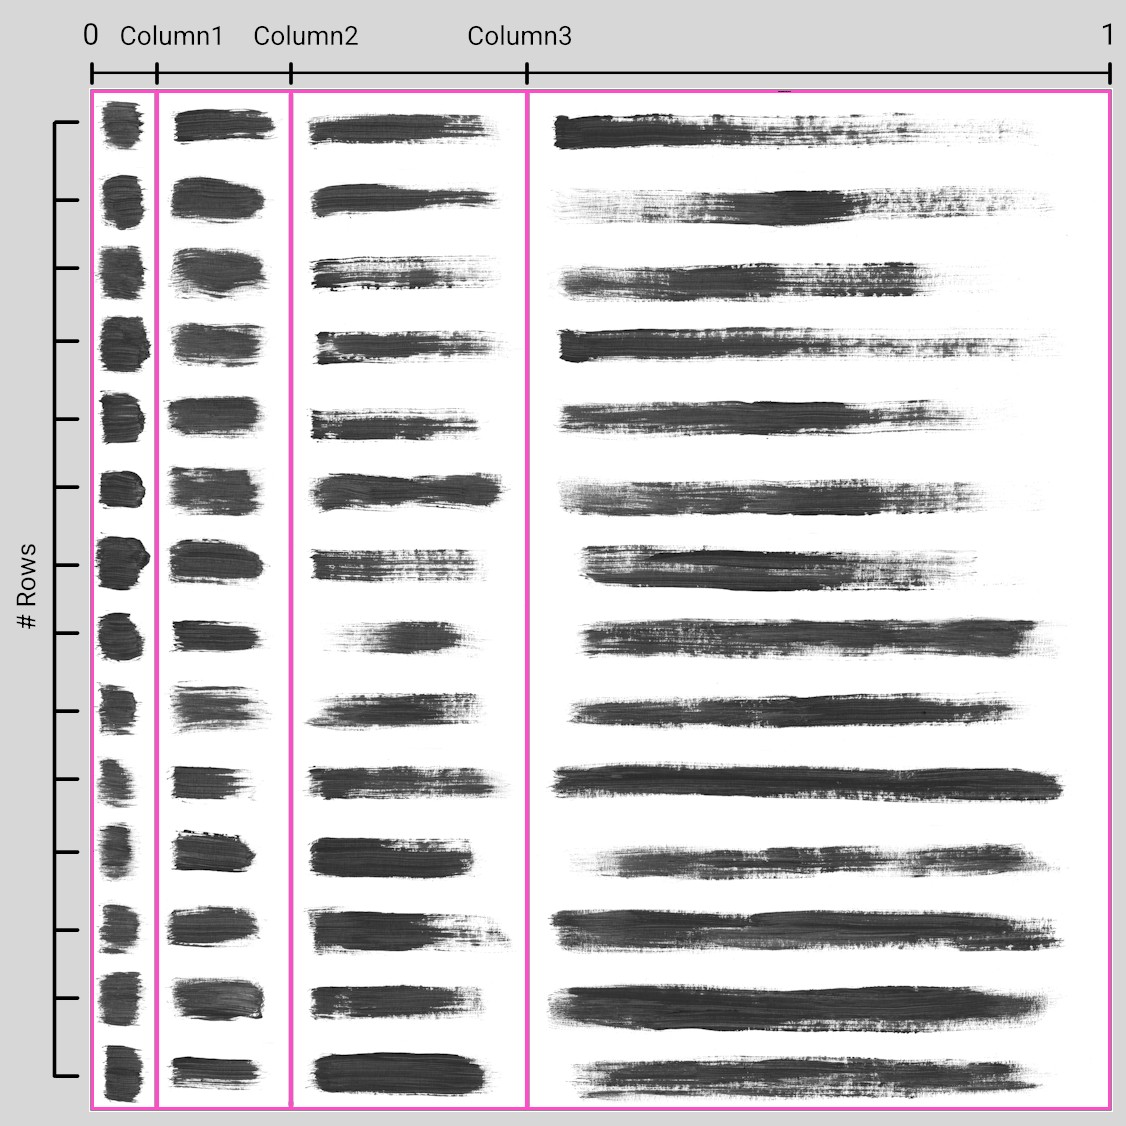
Brush styles are defined by individual node-groups that use attribute information of the brushstroke geometry and additional inputs to map an atlas texture to the geometry with a mask as ouput. Creating new brush styles is done by duplicating an existing node-group asset that defines a brush style from a template and changing its referenced brush atlas texture and mapping parameters.
Atlas Mapping
The template can be taken from the bundled brushstroke_tools-oil_brushes.blend.  The node-group parameters need to be matched with the brushstroke atlas grid like in the example figure.
  Alternatively the mapping node-group can be replaced with another one (e.g. provided
 .BSBST-brush_mapping for the Patches brush style type as a generic grid).
Additional information about our process in production for this step can be found in this blog post.
Node-Group Customization
Everything in the node-group can be customized if necessary. Node-group inputs to the brush style will show up automatically as parameters in the brush style user interface of the addon (e.g. the provided Blend and Seed parameters).
Name
Brush styles are identified by their name, so the naming of the node-group defining a brush style has to follow a certain shape:BSBST-BS.{Category}.{Type}.{Name} ( Example: BSBST-BS.Oil Paint.Brushstrokes.Dry (Loaded) )
Category, type and name can be any string, but cannot contain a '.' (period) character, as this is used as a delimiter. This may change in the future as the asset system in Blender is extended with an API.
Avoid name collisions between brush styles for proper behavior.
Preview Image
To add a preview for the brushstroke the node-group datablock needs to be marked as an asset and the preview image can be assigned as a thumbnail in the asset browser. Resolution and aspect ratio can be chosen freely, but it is recommended to use 2:1 / 512px:256px.
Pack Resources
The image file should either be packed as a resource into the .blend file or stored on disk in a maps directory next to the .blend file containing the node-group. This is not strictly necessary but recommended.
To pack the brush styles as an installable bundle the resources can simply be zipped or packed into a single .blend file. Be sure to include all necessary resources in the pack.
FAQ
- Why does the fill layer not react to me drawing the flow curves?
- Most likely you don't have a valid UV map on your surface mesh. Try doing a simple Auto-UV unwrap and adding the fill layer again.
- Why is the fill layer reacting badly and inaccurately to the drawn flow curves?
- Most likely your surface mesh has a low resolution. The flow requires a certain mesh resolution to be interpolated properly.
- I am using Cycles for rendering and there are black spots all over the place.
- This method of stylized rendering makes heavy use of overlapping transparent planes. This means Cycles need to do a high number of transparent bounces for the image to resolve nicely during rendering. To help with this setting you can use the
Render Setupoperator in theAdvancedpanel.
- This method of stylized rendering makes heavy use of overlapping transparent planes. This means Cycles need to do a high number of transparent bounces for the image to resolve nicely during rendering. To help with this setting you can use the
- I'm experiencing poor performance. How can this be avoided?
- This method is computationally intensive and relies on high level hardware to run smoothly. But there are a few things that can be done to avoid low perfromance.
- If it's about tweaking shape parameters, then it doesn't have to do with the rendering, but is about the geometry evaluation and it just helps to keep the amount of brushstrokes and their resolution low, to reduce the amount of geometry that needs to be processed.
- If just in the static case, orbiting the camera is slow, then it has to do with Eevee and keeping the amount of pixels that need to be rendered low helps most. For example you can change the Pixel Size in the
Performance-Viewportsettings. Samples don't help with interaction, since during that only 1 sample is rendered anyways.