Actions
This page goes over the workflow of rigging a character's face with CloudRig and Action Constraints. To understand how this works, first you must be familiar with the Action constraint.
TL;DR: Action constraints allow you to move bones into a predetermined pose using a control bone. For example, you can pose your character smiling, save that pose into an Action, then set up constraints so that you can move a controller that will blend the bones into that smiling pose.
The Problem
If you've ever rigged a character with Action constraints, you're aware of the tedious set-up process: Each bone affected by an Action needs to have an Action constraint set up on it. Even with the Copy Attributes add-on that lets you copy constraints, iterating remains tedious. When trying to make a symmetrical setup, it gets much worse, since bones along the center of the character need to have both side's constraints with half influence.
The Solution: Action Set-ups
Note: Previously called "Action Slots", before Blender introduced a concept with the same name. You can find Action Set-ups when selecting a CloudRig metarig and then going to Properties->Object Data->CloudRig->Actions: 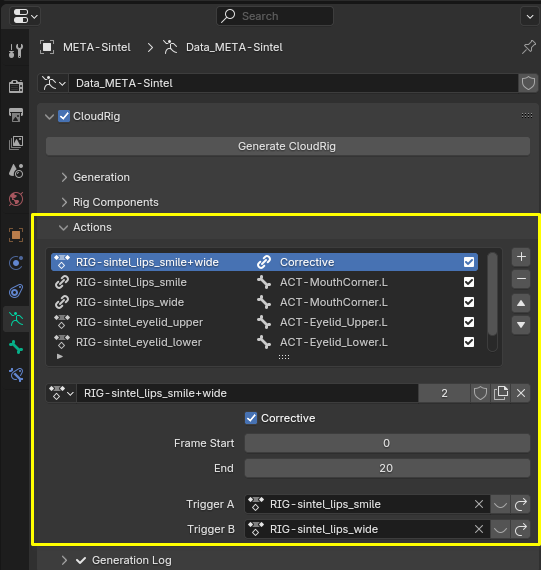
These are the steps one might take to set up a blinking and eye opening action:
- On the metarig, create bones named "Blink.L" and "Blink.R". Assign colors, widgets, etc as you wish.
- Generate the rig.
- Define the key poses of your Action:
- On the generated rig, pose and keyframe your blink pose on frame 20.
- Then, select all the bones you keyed, reset their transforms, and insert a key on frame 10.
- Optionally, you can pose and key an eye open pose on frame 0.
- Make sure to key "Blink.L"/"Blink.R" control bones. This will save you from having to input their min/max transforms.
- An Action can only be driven by a single axis of the control; Choose eg. X Rotation or X Location, and only pose that axis.
- I recommend to select all your keys, press
Tand set the key interpolation types toLinear. - Include both left and right sides in the poses.
- On the Metarig, add an Action Set-up.
- Select the action you've just created. (Give it a descriptive name!)
- Select the Action Slot that holds your poses.
- Select "Blink.L" as the control bone.
- If you keyed "Blink.L" as instructed, the activation parameters are auto-filled.
Regenerate the rig. When you move the Blink control, the action should activate and the character should blink with one eye for each control.
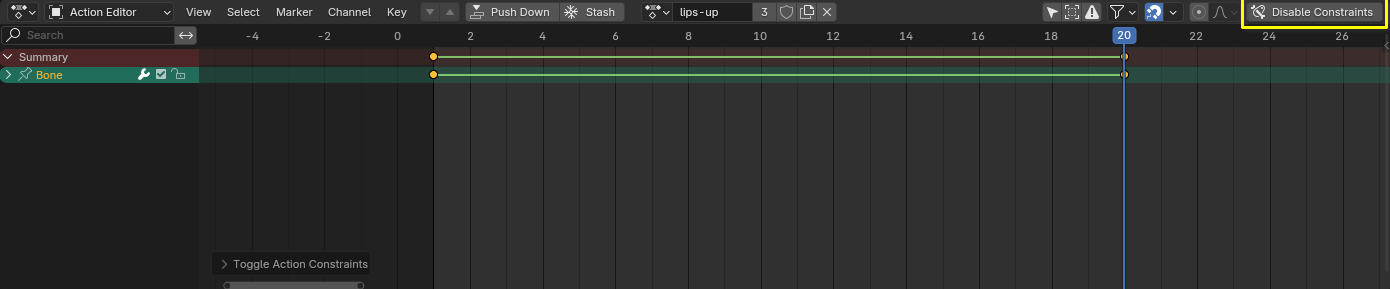
Iterating
So now we have our Action constraints on the affected bones. Now what if we want to edit the Action pose? You simply assign the Action to the generated rig in Dope Sheet->Action Editor, and scrub the timeline as normal. You may notice the pose will be applied double; Once by the active Action selected on the timeline, and once by the Action Constraints. To be able to edit the Action therefore, we must disable its corresponding constraints. You can do exactly that using this button in the Action Editor's Header:
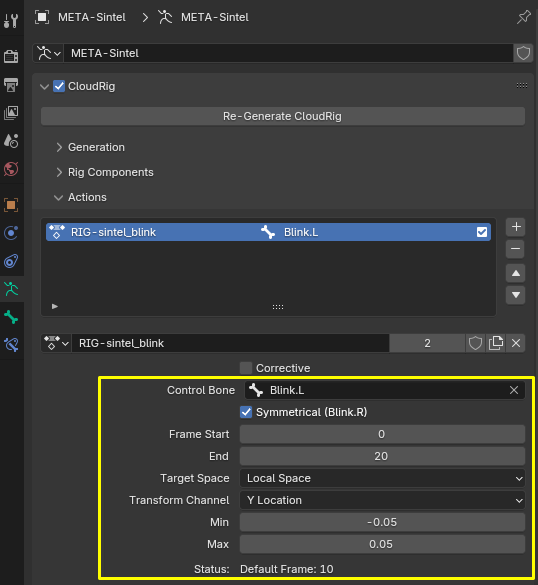
Symmetry
This option becomes available if the control bones are named symmetrically. In parantheses you will see what the opposite side bone name is expected to be. If a bone with that name doesn't exist, the Symmetry option will be grayed out.
In the above example, we have a "Blink" action. This contains the keyframes for BOTH the left and right eyes of the character. When we select either "Blink.L" or "Blink.R" bones as our control bone (it doesn't matter which), the Symmetry option appears, and is enabled by default. When generating the rig, the left-side bones will be controlled by "Blink.L" and the right-side bones by "Blink.R".
When using symmetry, bones which do not have an opposite are considered center bones. In this case, two Action constraints will be created with a 50/50 influence split. For example when creating an "Eyebrows Raise" action, the center of the forehead will be affected 50% by "Eyebrow.L" and 50% by "Eyebrow.R" controls.
Corrective Actions
If two Actions can deform an area of the character at the same time, they might not combine perfectly on first try.
For example, you might have "Lips Wide" and "Lips Up" actions, but when both of them are activated, the result is a disaster. That's where a Corrective Action comes in: A corrective action activates when exactly two other actions are also activating. This lets your shapes combine cleanly.
To set up a corrective action:
- Make sure you already have two actions fully set up and working. Let's stick with the "Lips Up" and "Lips Wide" example.
- Create a new Action Slot. Name it "Lips Up+Wide".
- On the generated rig, pose your controls so that both "Lips Wide" and "Lips Up" are being activated.
- Pose and keyframe the necessary corrections in the new empty Lips_Up+Wide Action Slot.
- Remember the default pose also must be keyed. Eg., key the default pose on frame 1, and your corrections on frame 10.
- Remember to set the keyframe interpolation to Linear.
- Go back to the MetaRig, add a new Action Set-up, select the Action Slot holding your keyframes, then enable the "Corrective" checkbox.
- Select the two "Trigger Actions" in the selection boxes that appear.
- The Frame Start/End values should auto-fill, and then you can Re-Generate.
Note: It doesn't matter where Corrective Actions are placed in the list. CloudRig will determine the correct order for the constraint stack.
Shape Keys
For any shape key of any object that is parented to the generated rig, if the shape key is named the same as your selected Action Slot in one of CloudRig's Action Set-ups, a driver will be automatically created on the shape key value. For symmetrical actions, you must put .L/.R at the end of the shape key name. For example, if you have an Action called "MyAction" with a slot inside it named "Blink", which is used for a symmetrical Action Set-up like in the example above, then any shape keys named "Blink.L" and "Blink.R" on any child meshes of the generated rig will be automatically driven. Note that the name of the Action itself doesn't matter, only the name of the Action Slot.