Component Types
Component types are rig generation behaviours that can be assigend to Pose Bones. For example, to generate a leg rig, you would assign the Limb: Biped Leg component type to your character's thigh bones.
Each component type has many parameters to customize the set of features that will be in the generated rig. You can keep re-generating the rig to try out different parameters. Also make sure to mouse hover each parameter and read the tooltips.
If you find any parameters which aren't documented here, or which behave differently than they should, please report a bug.
Overview
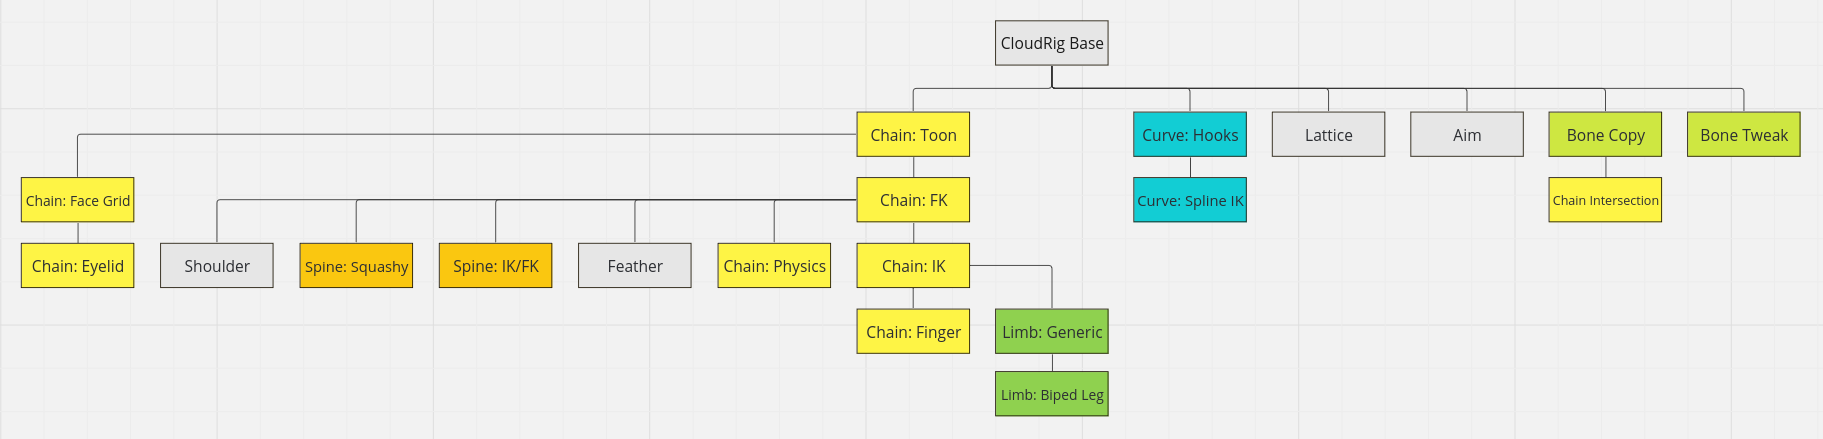
These are CloudRig's component types. Most component types are built on top of others, meaning they inherit each other's functionalities. The image above and the table of contents below shows this inheritance hierarchy.
- Shared Features
Assigning Components
You can assign a component to a bone in the metarig. For chain components, the connected children will be part of the same component, as long as they aren't assigned a component of their own. You can assign components to bones in two places in the UI:
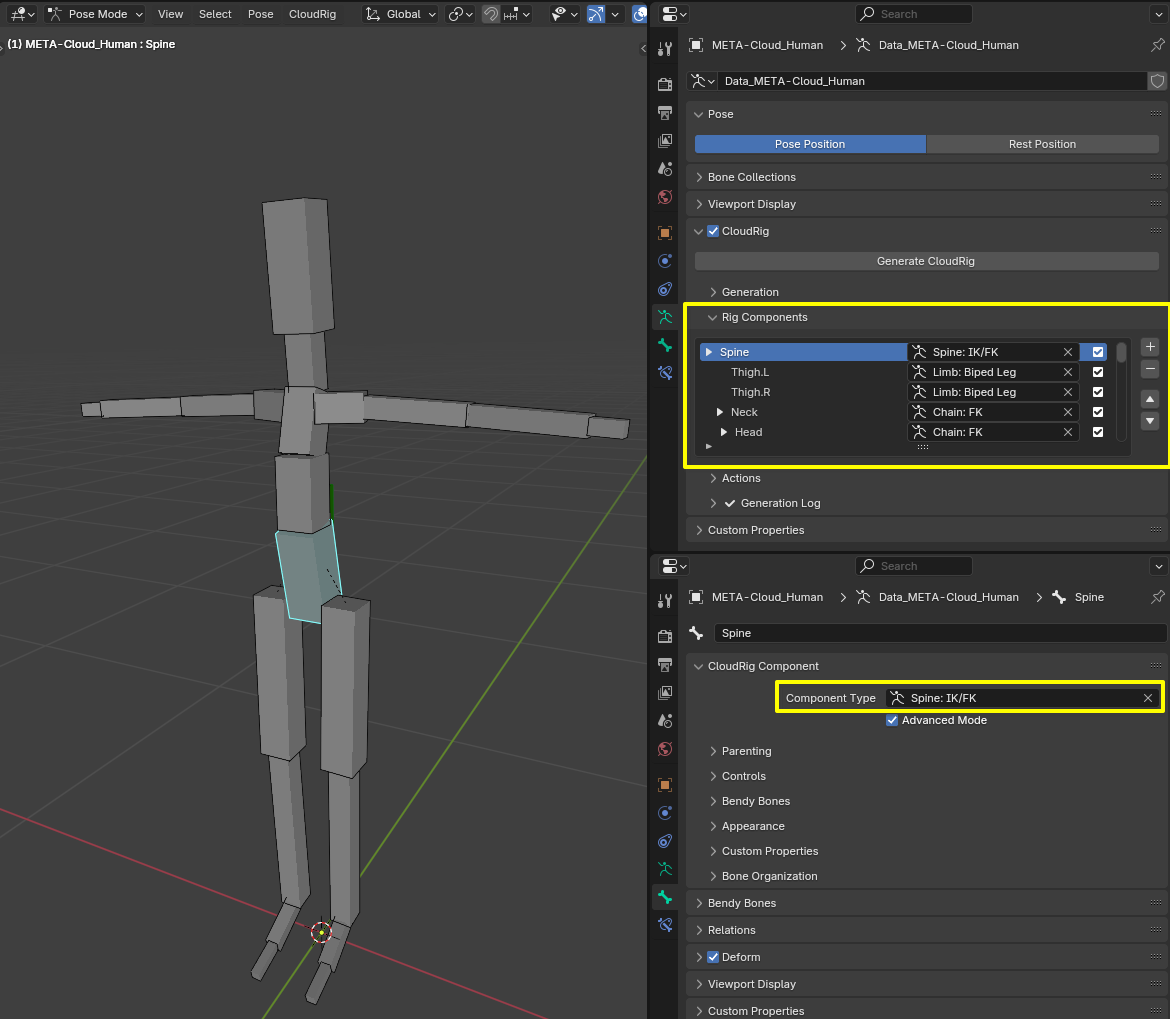
- Properties -> Bone -> CloudRig Component -> Component Type. This panel only appears when the 'CloudRig' toggle is enabled in the Armature properties.
- Properties -> Armature -> CloudRig -> Rig Components. This is a list that shows the hierarchy of all your rig components, and allows you to re-order siblings in the generation order. Hit the + button to assign a component to the active bone.
Copy/Mirror Components

You can copy and mirror component types using the operators found in the CloudRig header menu.
- Copy Component: With 2 or more bones selected, copy the CloudRig Component (type + all parameters) from the active bone to all selected bones.
- Symmetrize Components: Mirror the CloudRig Component (type + all parameters) from the selected bones to their opposite sides. This will also flip bone names found among the parameters.
Component Samples
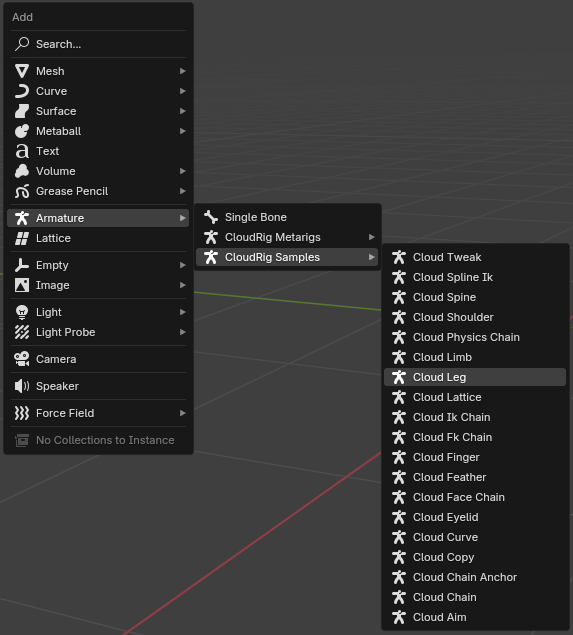
Each component type comes with a sample so you can get something up and running quickly and start playing around with it. You can add these in the 3D View via Add (Shift+A)->Armature->CloudRig Samples:
Shared Features
All CloudRig component types share some basic functionality, like letting you choose a parent for the component's root, and even specify a parent switching set-up for it.
Advanced Mode
Technically a user preference, enabling this lets you see options that are deemed not important enough for beginner users, as well as parameters which are forced to a certain value and cannot be changed.Constraint Relinking
On any component, you can add constraints to the metarig bones. On generation, these constraints will be moved to the generated bones that make the most sense for a given component type.
Shared Parameters
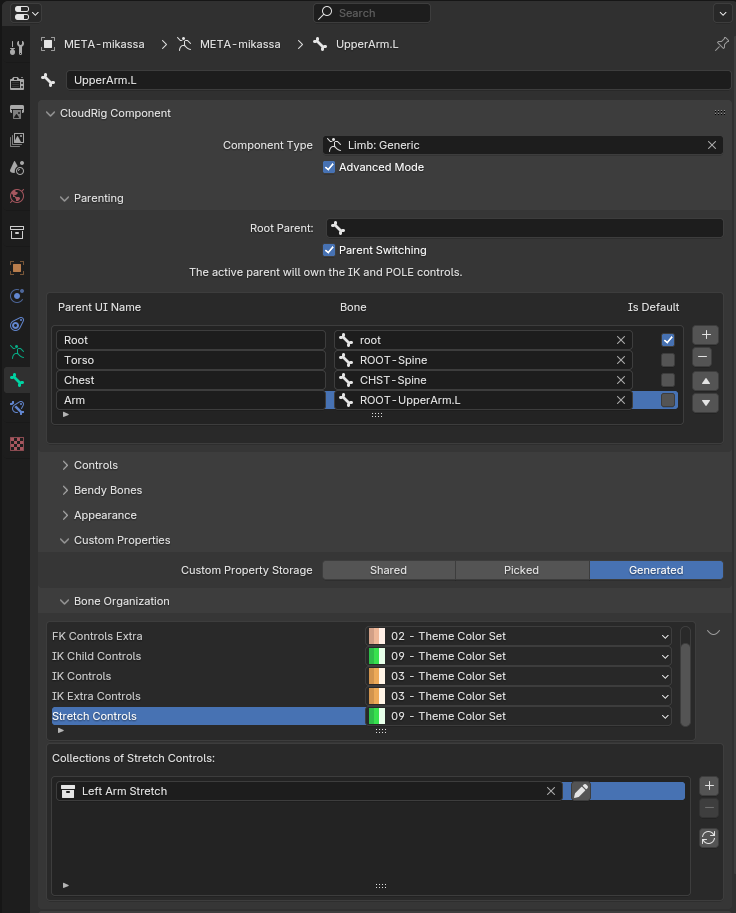
Root Parent
If specified, parent the root of this component to the chosen bone. You're choosing from the generated rig's bones here. If the chosen bone is a bendy bone, additional options appear: - Use an Armature constraint instead of normal parenting: This constraint takes bendy bone curvature into account, but it also means the parenting transforms will affect the bone's local matrix. If you want to use the bone's local transformations to drive something, you essentially won't be able to. - Create parent helper bone: This fixes the local matrix issue by creating a parent helper bone for the aforementioned Armature constraint.
Parent Switching
This option lets you create a parent switcher by entering the bone names of each parent on the left side, and optionally, a UI name on the right side. The bone names are chosen from the generated rig. The chosen bones will be the available parents for this component's root bone, and a selector will be added to the rig UI. Different component types may implement parent switching differently. The specific behaviour is explained underneath the checkbox when it is enabled.
Base Name
This option will be available for any rig component that offers you to be more specific with naming its bones and custom properties. For example, for an arm rig, you might not have a bone named "Arm", since they would be named "UpperArm", "Forearm", "Wrist". If you wanted the IK/FK Switch in the Rig UI to show as "Arm IK/FK" rather than "UpperArm IK/FK", the Base Name option lets you achieve just that.
Appearance
This panel lets you customize the custom shapes of bones. By default, you can choose from CloudRig's library of custom shapes, but you can expand this list by specifying your own .blend file of custom shapes in CloudRig's add-on preferences. You can also switch to choosing from the objects of the current .blend file. Only mesh objects whose names start with "WGT-" will appear in the list.
Storage Bone
For components that need to create custom properties, this parameter lets you choose where those custom properties are created, eg. for IK/FK switching. This can matter for animator convenience when managing keyframes on these properties.
- "Default": A bone named "Properties" will be created to store custom properties.
- "Custom": If you want to store the custom properties on an arbitrary bone, this option lets you select one. The selected bone has to be higher in the metarig hierarchy than this component, else you'll get a warning.
- "Generated": Component types implement their own behaviours for creating a custom property storage bone in a place that makes most sense for that component type. For example, the Biped Leg component will put the properties bone behind the foot control.
Bone Sets
Components organize their bones using parameters called Bone Sets. These live under the Bone Organization sub-panel, which is only visible when Advanced Mode is enabled. Bone Sets are further explained on the Organizing Bones page.
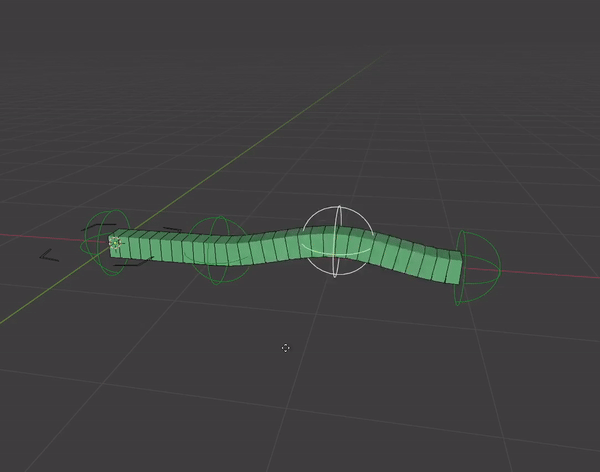
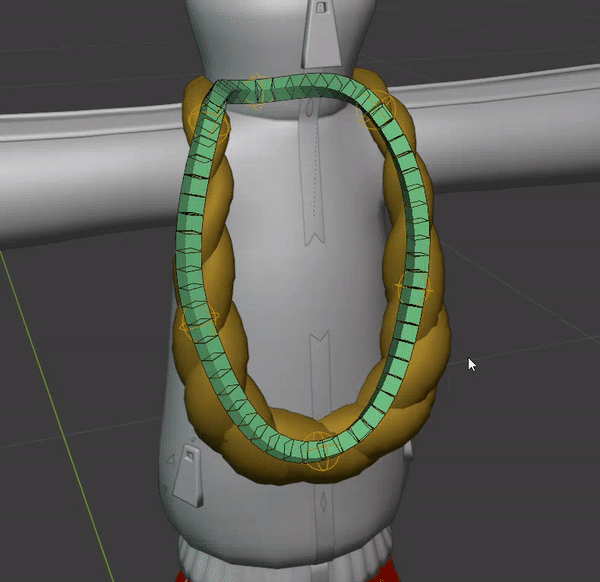
Chain: Toon
The most basic bone chain, consisting of independent controls connected by stretchy bendy bones. Can be useful for long, soft props, like a scarf on the floor, or soft circular things like a car tire.
Scaling the stretch controls uniformally gives the connected bendy bones more volume. Scaling them only on their local Y axis affects only the curvature of the chain.
Parameters
Stretch Segments
Number of sub-controls for each bone in the meta chain.Tip Control
Whether there should be a control at the tip of this chain.B-Bone Density
B-Bone segments will be distributed equally along the chain. As long as this value is >0, each bone will have at least 2 b-bone segments. A high density will not have a severe impact on performance.Sharp Sections
Bendy bones will not affect the curvature of their neighbours, unless their shared stretch control is scaled up on its local Y axis.Smooth Spline
Bendy bones will have a wider effect on the curvature of their neighbours, to easily get smoother curves. Works best when Deform Segments is 1, but that is not a requirement. Works fine with Sharp Sections, but it will only take effect once a stretch control is scaled up along its local Y axis.Deforming
Whether the bendy bones generated for this chain contribute to Armature deformation or not.Squash & Stretch
When enabled, deform bones will become fatter when squashed, and slimmer when stretched.Volume Variation
When Squash & Stretch is enabled, this slider defines the strength of the squashing effect.Create Shape Key Helpers
Create helper bones that can be used to read the rotational difference between deform bones. Useful for driving corrective shape keys. These helpers will be prefixed "SKH" for "Shape Key Helper".Create Deform Controls
Create controls that allow you to translate and scale deform bones by disconnecting them from their neighbours.
Chain: Layered
Extends the functionality of the Toon Chain with the ability to create or specify a higher "layer" of bendy bone controls, which the lower layer will be glued to using Armature constraints.
Parameters
Parent Chain
If provided, use this Toon Chain as the parent of this chain instead of generating a single bendy bone with controls.
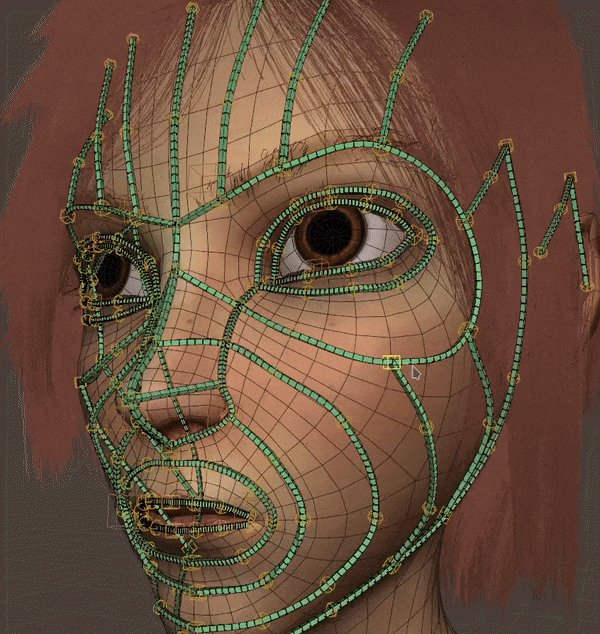
Chain: Face Grid
Extends the functionality of the Toon Chain with functionality to create intersection controls in locations where multiple chains intersect. Can be used to create a grid of bendy bone chains. Can be useful for faces, but I personally no longer recommend this workflow. As cool as it looks, it's difficult and unintuitive to control small areas, and difficult to set up.
Parameters
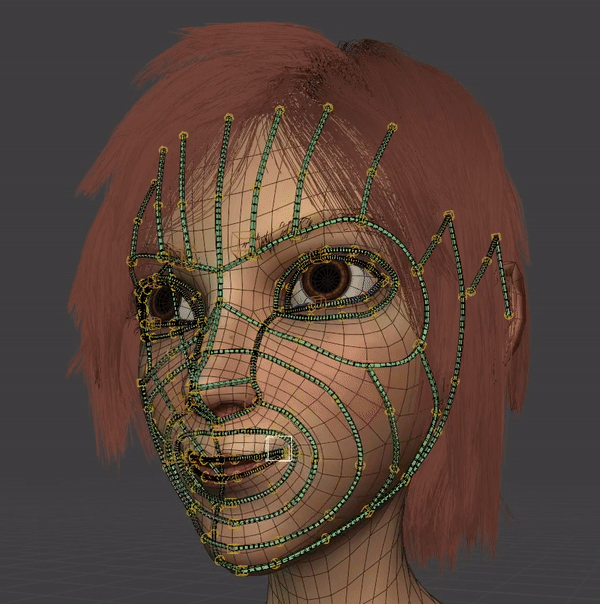
Merge Controls
Create controls for points where multiple Face Grid chains intersect. If a Chain Intersection component is found at that intersection, that will be used instead of generating one from scratch.
Chain: Eyelid
This component should be parented to an Aim component, presumed to be an eyeball. The rotation of that Aim component (eyeball) will affect this eyelid component. The strength of this effect can be adjusted by animators in the rig UI under a Face Settings panel. This can give a decent fleshy eyelid set-up very quickly, but for a main character, I advise instead to create Action Set-Ups to connect the eyeball's up-down and left-right rotations to hand-crafted eyelid poses. This will allow you to hand craft the way the eyelids react to the eyes in great detail.
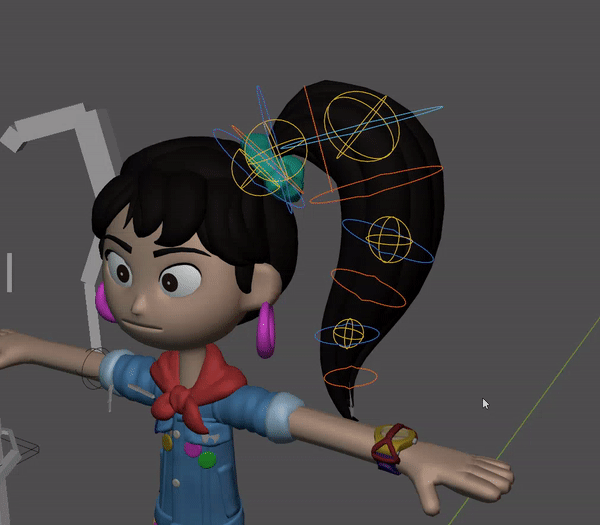
Chain: FK
Extends the functionality of the Toon Chain. In addition to stretch controls, this also creates FK controls, which are parented to each other in a hierarchy. Useful for fingers, tails, hair, appendages, a vast array of things.
Parameters
Create Root
Create a root control for this rig component. This is required for the Hinge Toggle.Hinge
Set up a hinge toggle. This will add an option to the rig UI. When FK Hinge is enabled, the FK chain doesn't inherit rotation from its parent.Curl Control
Create a control that lets you easily curl this FK chain. Can be useful for tails and fingers and such. Requires a root bone for space calculations.Curl Each
Make each FK control inherit rotation from its parent. This can be combined with the "Curl Control" parameter above, but it will change its behaviour and isn't really recommended.Counter-Rotate Stretch Controls
Amount by which the STR controls should "resist" the rotation they inherit from FK bones. A value of 0.5 is useful for smooth chains.Inherit Scale
Sets the scale inheritance type for FK controls. The "Propagate" option will use the rotation mode of the metarig bones for the corresponding FK controls.Rotation Mode
Rotation Mode for the FK controls. The same "Propagate" option is available here.Duplicate First FK
Create an extra parent control for the first FK control.
Test Animation
This panel will only show when the "Generate Action" Generator Parameter is enabled. When this option is enabled, this component will add keyframes into the generated action which can be used to test character deformations.Rotation Range
The negative and positive rotation amount in degrees to use for the aforementioned test animation.Rotation Axes
Which axes you want tested in the test animation. For example for fingers, you probably only need one axis.
Chain: Physics
Extends the functionality of the FK Chain component with a physics setup that utilizes Blender's built-in cloth simulation (for better or worse). The FK controls are constrained to a cloth mesh, and can't be posed. However, optional Physics controls can be created to deform the cloth mesh. The simulation is applied on top of this deformation. This can be useful for achieving a video-gamey physics sim for things like a character's ponytail or any other appendage.
Parameters
Cloth Object
The cloth object that the FK chain will be constrained to with Damped Track constraints. The object should have vertex groups named "PSX-FK control_name". You can leave this unspecified at first and a simple object will be generated for you, which you can later modify.Force Re-Generate
If you intend to modify the cloth mesh, make sure to disable this option since otherwise re-generating the rig will also re-generate the cloth mesh. Enabling this is useful however when you are still iterating on the shape of the bone chain, in which case you want to re-generate the mesh every time.Pin Falloff
Type of the vertex weight falloff curve for the chain of vertices making up the cloth mesh.Pin Falloff Offset
Stretch factor for the pin falloff curve. Increasing this will make the cloth more stiff.Create Physics Controls
When enabled, this will create a PSX control chain which lets you control the cloth simulation. This will only work on pinned vertices - vertices with a pin weight of 0 will only be affected by the cloth simulation, while a weight of 1 means being fully affected by the armature.
Feather
Some small tweaks to the FK Chain component to work a bit better for an individual feather of a bird. Requires a single bone.
This component type comes with no additional parameters.
Spine: IK/FK
Builds on the FK Chain component with additional option for creating an IK-like set-up for a spine.
Parameters
Spine: Cartoon
A spine set-up of any length (although at least 3 bones) perfect for cartoony characters, with squash and stretch. This spine rig was developed for the Storm character rig.
Parameters
World-Align Torso
Flatten the torso control to align with the closest world axis.
Spine: Squashy
As of Blender 5.0, this component type is deprecated, and will soon be removed. The new Spine: Cartoon component should be used instead, which is similar and hopefully better. Also builds on the FK Chain component, but instead of an ability to have the spine be lead by the hip movements, this set-up allows the torso to be squashed, and the animator can control the amount of volume preservation. Useful for more cartoony stuff.
Parameters
Shoulder
A very simple extension of the FK Chain component, essentially just changes the bone shape.
Parameters
Forward Axis
Rotate the bone shape to align with this axis of the bone.
Chain: IK
Extends the FK Chain component with IK functionality. The default direction of the pole target is determined based on the curvature of the bone chain. This requires at least 2 bones. This rig adds IK/FK switching and snapping and IK Stretch settings to the rig UI.
Parameters
Create IK Pole
Whether the IK constraint should use a pole target control, and whether such bone should even be created.Pole Parent Switching
Whether the IK Pole's parent switching options should be unified with that of the IK Master, or be completely independent instead.IK At Tail
Put the IK control at the tail of the last bone, rather than at its head.World-Aligned IK Master
Align the IK master control with the nearest world axis. Not recommended for arms when your resting pose is an A-pose.Flatten Bone Chain
Although not a parameter, this button will modify your metarig's IK chain to ensure a "perfect IK chain"; The chain will be flattened along a plane, and its bone rolls will be calculated to point towards the elbow. This way, when the rig is generated, the IK chain will not affect the rest pose at all.
Chain: Finger
Changes the IK Chain component with some specific behaviours useful for fingers. The fingers should bend in their local +X axis. The IK settings of finger rigs are organized into a sub-sub-panel in the rig UI, because there are usually a lot of fingers, resulting in a lot of UI sliders.
This component has no additional parameters.
Limb: Generic
Extends the IK Chain component with cartoony rubber-hose functionality. This requires a chain of exactly 3 bones.
Parameters
Duplicate IK Master
Create an extra child control for the IK master.Limit Elbow Axes
Lock the Y and Z rotation of the elbow, constraining the rig to realistic rotation axes. More importantly, this is necessary for precise IK->FK snapping.Rubber Hose
This option is only available when Smooth Chain is enabled and Deform Segments is greater than 1. When this option is enabled, a slider is added to a rig UI which lets you have an automatic cartoony rubber hose limb effect.With Control
Instead of a UI slider, create a control bone that can be scaled to control the strength of the automatic rubber hose effect.Type
There are two ways to achieve the rubber hose deformation. One results in lengthening the limbs, while the other results in shortening them. It's a question of which style you prefer.
Limb: Biped Leg
Extends the functionality of the Generic Limb component with footroll. This requires a chain of exactly 4 bones.
Parameters
Chain: Sphere
A chain rig that's designed to move geometry along the surface of a sphere. Think the eyelid on a giant eyeball.
Parameters
Curve: With Hooks
Create hook controls for an existing Curve object. Multiple splines within a single curve object are supported. Each spline will have its own root control.
Parameters
Curve
The target curve object to be hooked up to bone controls. Must be chosen!Custom Name
String to use to name the bones. If not specified, use the base bone's name.Inherit Scale
Scale inheritance setting of the curve hook and spline root controls.X Axis Symmetry
Controls will be named with .L/.R suffixes based on their X position. A curve object that is symmetrical around its own X 0 point is expected, otherwise results may be unexpected.Controls for Handles
For every curve point hook control, create two children that separately control the handles of that curve point.Rotatable Handles
Set up the handle controls in a way where they can be rotated. Note that they will still allow translation, but if you translate them, rotating them afterwards will be unpredictable.Separate Radius Control
Instead of using the hook control's size to control the curve point's radius, create a separate child control to do so.
Curve: Spline IK
Extends the functionality of the Curve With Hooks component, where instead of adding bones to control an existing curve object, it creates a new curve object along a chain of bones and creates a Spline IK constraint setup. The curve is always re-generated along with the rig. The curve parameter is grayed out, since it will be created for you. You cannot specify a custom curve. Instead, if you want to change the shape of distribution of the curve, simply make those changes in the bone chain. This can contain more information.
Parameters
Curve Handle Length
A multiplier on curve handle length. 1.0 means the curve handle is long enough to reach the neighbour curve point.Deform Setup
How this component should behave with Armature modifiers:- None: Don't create deformation bones. Then this component cannot be used with Armature modifiers.
- Preserve: Preserve the Deform checkbox of the bones as set in the metarig.
- Create: Create DEF- bones that are a separate chain with the Deform checkbox enabled.
Subdivide Bones
When Deform Setup is set to Create, this value defines how many deforming bones to generate along each original bone in the metarig. More bones results in a smoother curvature. However, the Spline IK constraint only supports a chain of up to 255 bones.Bendy Segments
When Deform Setup is set to Create, this can be used to enable Bendy Bone segments on the deform bones. These will NOT perfectly follow the spline's curvature, but can help smooth things out in some cases.Match Controls to Bones
When enabled, control bones will be created at the locations of the meta chain's bones. When disabled, control bones will be distributed an equal distance from each other along the chain.Number of Hooks
When "Match Controls to Bones" is disabled, this specifies how many controls should be placed along the chain.Create FK Chain
Create an FK chain of controls, on top of the hook controls.
Curve: IK with Hooks
Extends Curve: With Hooks by adding an IK handle at the tip of each spline. The animator poses the IK handle to gesture the curve into a rough position, then refines the shape by animating the individual hooks. Useful for things like shoelaces, ropes, ponytails, or any curve where animating every hook by hand would be tedious. If no curve is assigned, one is auto-generated along the metarig bone chain at generation time.
Parameters
Curve
The target curve object. If empty, a bezier curve is auto-generated along the metarig bone chain. Once assigned (or auto-generated), it is preserved on subsequent generations — only edit the curve directly if you want to change its shape or point count.Create IK Pole
Whether to create an IK pole target control to control the bend direction of the IK chain. Shared with the Chain: IK component.Match Controls to Bones
Auto-Generated Curve only. When enabled, the auto-generated curve has one point per metarig bone joint. When disabled, points are distributed evenly along the chain length. Shared with Curve: Spline IK.Number of Hooks
Auto-Generated Curve only, when Match Controls to Bones is disabled. Number of curve points to create. Shared with Curve: Spline IK.Curve Handle Length
Auto-Generated Curve only. Bezier handle length multiplier on the auto-generated curve. Shared with Curve: Spline IK.
Parent Switching applies to the IK master, so the IK handle can be made to follow a chosen parent bone (e.g. a ponytail tip following the head).
Lattice
Creates a lattice with a root and a hook control. The hook control deforms the inside of the lattice using a spherical vertex group that gets generated. You can manually add Lattice modifiers to objects that you want to be deformed by the created lattice. This is a very performant and very flexible way to slightly nudge or bulge things. Every rig should have a few of these lattice set-ups scattered around, particularly clothing and faces. You never know when it might come in handy, but it often does.
Parameters
Lattice
The lattice object that will be generated. If empty, one will be created.Regenerate
Whether the lattice should be re-generated from scratch or not. Disable this if you want to customize the lattice, otherwise any changes beside the object's name, will be lost when you re-generate the rig.
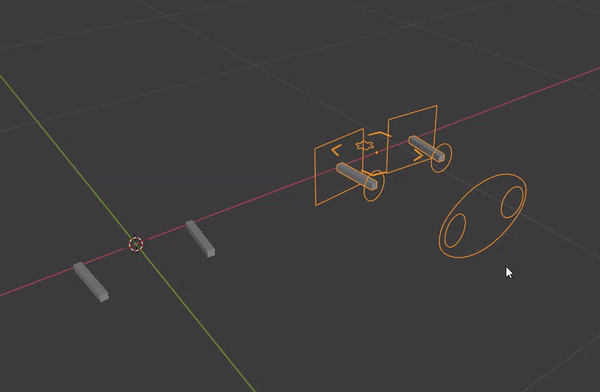
Aim
This rig creates an aim control for a single bone. Can be useful for cameras, eyes, or anything that needs to aim at a target.
Parameters
Aim Group
Aim rigs belonging to the same Aim Group will have a shared master control generated for them.Target Distance
Distance of the aim target from the base bone. This value is not in Blender units, but is a value relative to the scale of the rig.Flatten X
Discard the X component of the eye vector when placing the target control. Useful for eyes that have significant default rotation. This can result in the eye becoming cross-eyed in the default pose, but it prevents the eye targets from crossing each other or being too far from each other.Create Deform
Create a deform bone for this rig. May not be always needed, for example if you just want to object-parent something to the aim rig, like a camera.Create Root
Create a root bone for this rig.Create Highlight Control
Create a secondary control and deform bone attached to the aim control. Useful for eye highlights. The extent to which it follows the eye's rotation can be controlled in the Rig UI under the Face panel.
Raw Copy
This component type is implicitly assigned to all metarig bones - Any bone that isn't part of any other component will be treated as a Raw Copy component. You can also assign it explicitly if you want to deliberately interrupt a chain, or if you simply prefer to explicitly indicate that a bone should be simply copied to the generated rig.
As the name implies, a Raw Copy bone will be copied into the generated rig with almost no additional processing. The exception to this is that Constraint Relinking (and driver relinking) will still be performed on the bone, so any constraints or drivers pointing at the metarig will point at the generated rig instead.
Single Control
This component type lets you create a single control with some helper bones. Useful for creating face controls or any other arbitrary control you want to add.
Constraints will be relinked to the copied bone.
Parameters
Create Custom Pivot
Create a parent control whose local translation is not propagated to the main control, but its rotation and scale are.
Create Deform Bone
Create a second bone with the DEF- prefix and the Deform property enabled, so you can use it as a deform bone.
Ensure Free Transforms
Move any transform property drivers or constraints on the tweaked bone to a parent helper bone prefixed "CON-". This can be useful when your drivers/constraints would lock the bone, or affect its local transform matrix.
Custom Properties: UI Sub-panel
Choose which sub-panel the custom properties should be displayed in. If empty, the properties won't appear in the rig UI.
Custom Properties: UI Label
Choose which label the custom properties should be displayed under. If empty, the properties will display at the top of the subpanel.
Chain Intersection
This component is an extension of "Single Control" with a special interaction with Face Grid components.
Details
When a Chain Intersection is placed at the same location as one or more Face Grid bones, the Chain Intersection will be used as the intersection control, rather than automatically creating that intersection control. This can be useful because the automatically generated intersection controls have unwieldy bone names, and their orientation may also need to be customized.
This component has no additional parameters.
Bone Tweak
This component type lets you tweak aspects of a single bone that is expected to exist in the generated rig.
Parameters
Additive Constraints
When enabled, the constraints on this bone will be added on top of the target bone's already existing constraints, and then relinked. Otherwise, the original constraints will be overwritten.Ensure Free Transforms
Move any transform property drivers or constraints on the tweaked bone to a parent helper bone prefixed "CON-". This can be useful when your drivers/constraints would lock the bone, or affect its local transform matrix.Tweak Parameters
The bone's properties are split into these categories:- Transforms
- Locks
- Rotation Mode
- Bone Shape
- Collections
- Color Palette
- IK Properties
- B-Bone Properties
- Custom Properties Each of these can be chosen to be copied over to the target bone or not. For example if you just want to add some extra constraints to a bone, you probably don't want to overwrite its transforms, bone shape, etc, so you would leave all of those unticked, and they will remain untouched.
Component Instance
This component type references another, and the generator will act as if the same component is assigned with the same parameters. Can be useful to reduce the amount of times you need to copy or mirror components between bones, since this allows you to create live references instead.
For example, if you want a particular finger configuration on all fingers, you can just define it on a single finger bone, and reference that one from all other fingers.
Parameters
Source Bone
Select another bone which has a component type assigned. This bone will act as if the same component with the same parameters was assigned to it.Mirror
Flip left/right side names when copying parameters from the Source Bone. For example, the bone names in parent switching set-ups will be flipped.