CloudRig
This page aims to give you an introduction to CloudRig, the Blender Studio's rig generation and rigging workflow enhancement add-on. You can find CloudRig on the Extensions platform, which also means you can install it from directly within Blender. You can also report bugs here.
Learning Resources
Older pieces of documentation may still be useful, but CloudRig has changed a lot over the years, so things might look quite different now.
- 2021: Video Documentation Series
- 2021: Snow Rigging Livestream Series
- 2024: Mikassa Rigging Livestream Series (Unfinished)
- This wiki is always kept up to date, since updating text is much easier than updating videos.
- Inside Blender, on most CloudRig UI elements, you can Right Click -> Online Manual to open the relevant wiki page in a browser.
General workflow
The rig generation workflow with CloudRig revolves around inputting parameters on a simple Metarig, which is then used to generate the Control Rig, which is what you will actually use to control your character. The Control Rig can be re-generated based on new Metarig parameters or proportions as many times as needed, until you get exactly what you want.
- Create a skeleton outlining the proportions of your character. This is your Metarig.
- Assign a Rig Component to specific bones that define the features that you want in your rig, such as a spine, arms, and legs.
- Customize the components using their parameters to change the available features and have the level of complexity you need.
- Generate the rig.
The simplicity of this workflow allows for fast iteration. If you want to add or remove a feature from the rig, there's no need for copy-pasting and renaming of hundreds of bones, or worse, manually making changes to dozens of bones, constraints and drivers just to make a slight change to how the rig behaves. You just tick or untick a checkbox and hit Regenerate.
So how is it done?
Getting Started
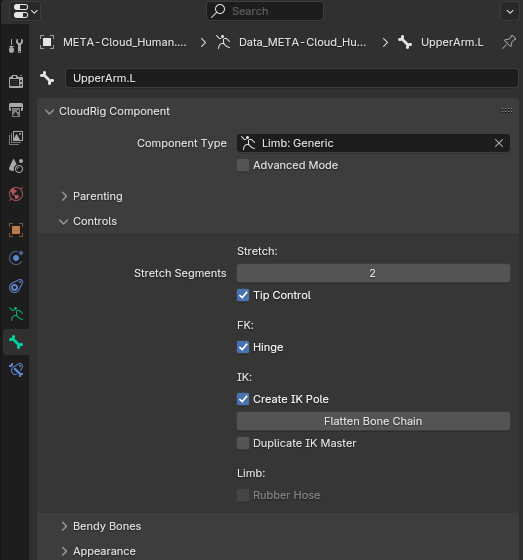
Spawn the Cloud Basic Human preset metarig via Add->Armature->CloudRig Metarigs->Cloud Human. Now try selecting the "UpperArm.L" bone in pose mode. Then go to Properties->Bone->CloudRig Component.

As you can see here, this bone is assigned the "Limb: Generic" Component Type, and you can see all of its parameters in this panel. This Component Type and these parameters determine the behaviour of the control rig that will be generated when you press the Generate CloudRig button.
CloudRig aims to cover a wide and ever expanding variety of needs with its component types. This is facilitated by the fact that it is being used in production at the Blender Studio. Whatever weird character (or prop!) those crazy guys come up with, CloudRig has to be able to generate a rig for it.
The CloudRig Types page covers all the available component types included in CloudRig.
Starting From Scratch
If you want to start from a fresh armature, all you need to do is enable CloudRig under Properties->Data->CloudRig. Here you will also find the Generation Parameters, which are a few high level pieces of data used for the generation process. The Rig Components sub-panel shows you a hierarchical list of bones which have components assigned to them. You'll also find some other panels, which are mentioned below.
Actions & Face Rigging
If you want to rig faces with CloudRig, you will probably want to use a combnination of component types such as Bone Copy, Chain: Eyelid and Aim. But the real magic will happen in the Action system. You can get an example of this by playing with the included Sintel metarig.
Generation Log
There are many ways to make mistakes while using CloudRig, also while rigging in general. CloudRig will NEVER automatically fix your mistakes, but it will try to detect them and give you suggestions or even one-button solutions to fix them. After generating your rig, you will find a list of potential issues here, in the Generation Log panel. Some of these issues will have a tailor-fitted button to fix the issue. This is all handled by the Troubleshooting module.
Rig UI
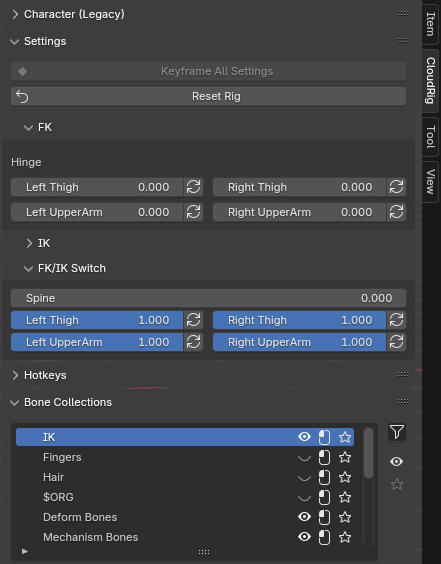
Once generated, select your generated rig, and press the N key to bring up the Sidebar. You should see a CloudRig tab, which contains the rig UI. This is where the animators will be able to find rig settings and a collection selector. 
CloudRig provides a way to add arbitrary custom properties to this UI as well, in case you want to allow animators to customize a character's outfits, materials, etc, with a nice and clean UI. Check out the Properties UI page to see how that works.
Organizing Bones
If you don't like the collections that CloudRig assigns the generated bones to by default, you can customize them in the Bone Organization parameters, which are only visible when Advanced Mode is enabled.
Making Tweaks
If you're rigging a character with specific needs, you will most likely end up needing a fine level of control over the rig. There are three primary ways to do this:
- The Bone Copy component lets you copy bones to the generated rig with all their constraints, bone shape, and other settings.
- The Bone Tweak component lets you tweak individual aspects of a bone that CloudRig generates for you, as long as the bone name matches.
- The Post-Generation Script feature lets you run a script whenever you generate the rig, allowing you to make completely arbitrary procedural changes, but this does require familiarity with Python.
Efficient Workflow
If you enjoy an efficient workflow that lets you focus on the actual work rather than searching for buttons and objects, I highly recommend reading through the Workflow Boosters page. CloudRig comes with a bunch of built-in hotkeys and pie menus to let you work faster.
Additionally, I recommend checking out our other rigging-related extensions, Easy Weight and Pose Shape Keys.