
You need to login to view this content
You can join Blender Studio for €11.50/month and get access to all of our training & film content instantly!
1: Head Sculpting
Sculpting a complete Planar Head
Aug. 12th, 2019
License: CC-BY
Julien Kaspar
Publisher
In this lesson we'll take the primitive head and define it further into a full planar head model to give a clear example on basic human head structure and anatomy.
Other helpful links:
- File 1: Head Sculpting Lessons: The collections of final head sculpts that are shown in the video
Join to comment publicly.
196 comments
I realise this is probably because i have a newer version of blender, or maybe im just being stupid (i'm completely new to blender and have no clue what i'm doing) but when i use the boolean modifier, it doesn't join the shapes, maybe there's settings i need to change or to use a different modifier? If you know what i'm doing wrong i'd really appreciate some help, thanks
Seems to be a sweet spot with the nose detail flood fill. I tried it a few times before I was able to get the nose box to smooth out.
Here's my version, but it looks weird :).
https://drive.google.com/file/d/1nuZkezLHNNVEWj72jAuqjPBZ33dOZhBc/view?usp=sharing
@Keshav Chaurasia i'm making a folder with all the progress screenshots here it is: https://drive.google.com/drive/folders/1x1G0ntGhrLbOopBtNFM97kU1n8K56ODh?usp=sharing
Here is my sculting:
Please feedback, Thank you!
I hate this time lapse commented format. It makes it way harder to follow.
i cant thank you enough Julien ! only this first part of sculpting helped me a lot understanding how proportions should be done and i got shocked from my own sculpt lol .. i already did some face sculpts before this course and they were obviously unnatural .. but following your instructions are game changing . props to you sir
https://drive.google.com/file/d/18aQsoOP7GdeMA1C0qeCuf_OnqgSgXvnr/view?usp=sharing
Im having an issue where it goes straight through :/
@Antonio Oliveira Can you explain more? Maybe even send a link to an image, video or .blend file?
Feels like I am a little bit too late for the party, but your tutorial is still good to follow in blender 3.0 Luckily, the sculpting tools are far better now.
https://scontent-atl3-1.xx.fbcdn.net/v/t39.30808-6/273118546_10224309236171410_7102875238436003980_n.jpg?_nc_cat=104&ccb=1-5&_nc_sid=5cd70e&_nc_ohc=0gkDdBVD6AMAX9uTa07&_nc_ht=scontent-atl3-1.xx&oh=00_AT9F3xiRyOKPP_fxYKNbkMqdVVZlCBolHX8YDlDXo0KCZw&oe=61FC51E1
Started smoothing already.
Already started the smoothing (haven't done the eyes yet). Pretty happy with how it looks (for a female character):
seems that when I place the cube in for the nose and make those first two adjustments I get an awkward look to the shape. What am I doing wrong?
@Jon Crowder Can you send an image? I would need more information to help.
Here is mine :)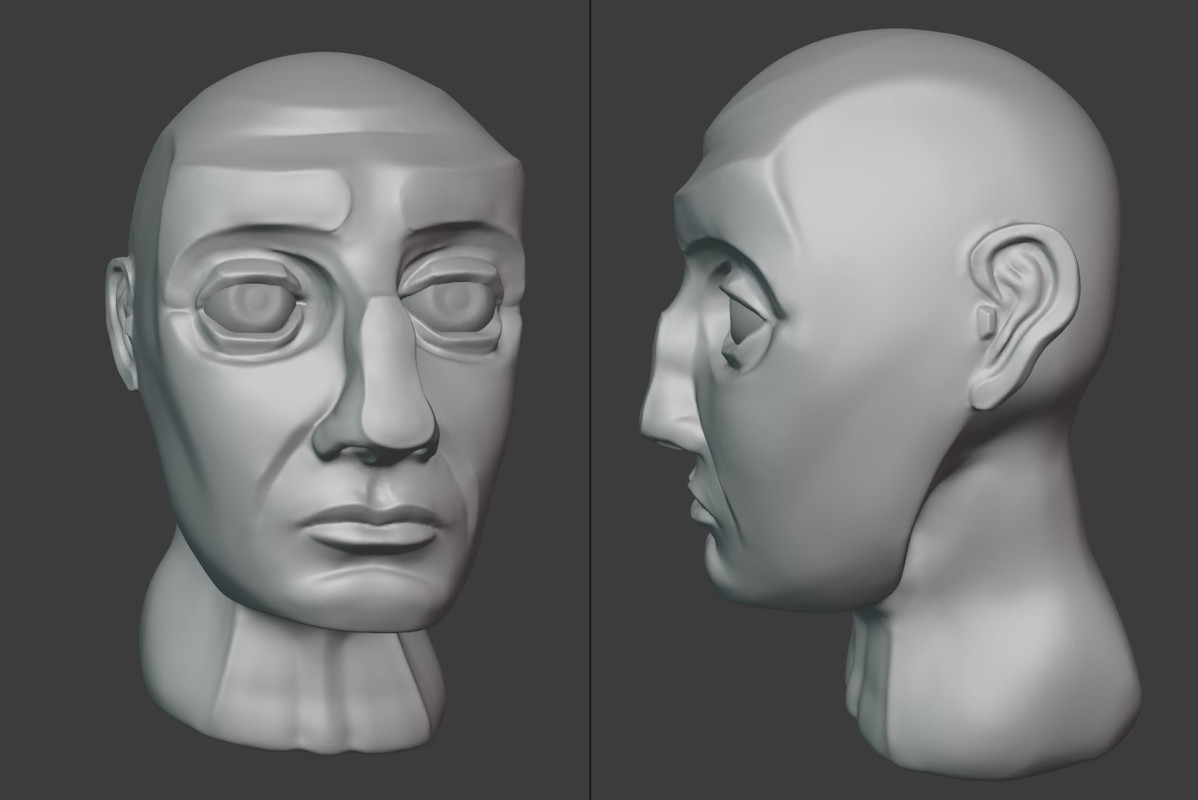
@Jellyfox With hair :)
This is great. Thanks a lot for sharing. I'm struggling with the nose and eyes. But I'm happy with the progress so far.
how do i deselect the lasso mask after i push the object inward.
@tuhina ranjan Sorry I'm not sure what you mean. Do you want to clear the mask? You can find most useful operations for masking in the mask pie menu (shortcut: A).
@Julien Kaspar thanks just "cleared" the mask
im trying to copy the mirror modifier of the ear to the eye its just not happening!!!
@tuhina ranjan Can you share some more info, a screenshot or even your .blend file?
@Julien Kaspar sharing my .blend link: https://www.dropbox.com/s/amyat5lscbs2lim/sculpting%20cloud.blend?dl=0
@tuhina ranjan There is not mirror modifier on the ear object. Did you maybe already apply it?
@Julien Kaspar Oh O! in that case i need to first give ear a mirror modifier and then repeat the process as in the video. hope i get it correct this time
Hi quick question on 09:07 how did you set only one object into wireframe while having the others solid, I've been searching everywhere I need the answer. Please. I know if you press shift+z it turns everything in wireframe. But you made only a single object into wireframe? How? I need to know.
@Melanie Ruano I think you mentioned a wrong timestamp or it's in a different video but I think I know what you mean. In the properties to the right -> Object tab (orange square) -> Viewport display -> Wireframe, you can show wireframes on a single object instead of all. You can also toggle this for all selected objects if you hold Alt while pressing the button or if you right click on it and click on "Copy to Selected".
I can't select the ear faces properly using 'lasso mask', no matter what type of 'cylinder cap fill type' i choose when i create it. It only selects few triangles. I'm not using any mirror/x-symmetry. https://drive.google.com/file/d/1NXpBnj_pE2ftqaWlTDEjNbt6GRiRAVIK/view?usp=sharing
@Vincent Beaudet Only vertices are being masked in sculpt mode. If you want to mask an entire face you will need to mask all vertices that are connected to it.
@Julien Kaspar , there's no vertices on the cap , i think i needed to remesh the ear, not sure tho. Thanks for the reply.
When sculpting the ear, I find it hard to clear the Lasso mask by pressing ctrl+m. Is there any other method that I can clear Lasso mask?
@parkchihun9 Try the Mask Pie Menu on A.
here is my work and i am having problem with making eyes
Hey sorry I'm not sure how to post an image but I'm really enjoying it so far I have been doing blender for 2 yrs now and I really think this is what I want to do for my future if you can please help me that would be great any tips and tricks would be very appreciated i have tried contacting you on instagram but I could see you have not been active on it for some time now If you could please tell me how to share an image that would be great thanks https://drive.google.com/file/d/19al3liMFGsmNVIJvqNwxQwmWkStKCiit/view?usp=sharing
@aidenv2005 https://drive.google.com/file/d/19al3liMFGsmNVIJvqNwxQwmWkStKCiit/view?usp=sharing
@Aiden Venter Overall this is looking good already. From that one angle I see one very common mistake though. Try to place the ears lower and the corner of the jaw higher. Look up some images from faces from the side and look at the distance between the ears and the jaw. Keep some references on the side on how you want the head shape to look like exactly. There's not specific right way for the head to look like. As long as it kinda looks like what you are going for you are doing great. Just keep going.
@Julien Kaspar Thanks so much that helps a tone I see what you mean about the jawline and ears it was very helpful
I did my best. I couldn't figure out why the smooth brush kept destroying everything or how to make soft "cuts" for the mouth... and I don't want to even get started about how long I was messing around with the ears, (because I refused to just delete them and start over), but they would just explode anytime I touched them.... regardless... after wrestling with this project for most of the day, this is where I'm leaving it. I learned a lot and, for that, I'm happy. I look forward to learning more tomorrow. For now... I sleep...
https://i.imgur.com/qy3IGfP.jpg
(p.s. I learned that, when using shift to smooth, I'm actually switching over to the smooth brush... and its settings... of which, the strength was very high. Adjusting this in the brush helped calm it a bit. Of course, I didn't realize this until the very end. )
@John Devilman Thanks for sharing! It's looking really good so far. For the ears I can recommend to inflate them a bit. If you sculpt on such a thin mesh it is almost unavoidable to affect both sides of it while sculpting, which will make it even thinner and messed up. For sharper definition on the lips you would need to increase your resolution.
@Julien Kaspar It's too late for me. I moved the eyes down and "squashed" the head a bit to bring down the overall length, and when I applied a boulean, the geometry revolt. Now, whenever I attempt to mirror my sculpting, the axis I'm trying to mirror along is off... or not even there, (the mirrored brush showing up far off the model, hovering in gridspace).
I just couldn't figure out how to make remesh work so that it wouldn't bog my computer or make the mesh into something that'd been hacked up by a machete.
This was a fun experiment. I'm probably just going to move onto the next character though. I'll have to look into how to increase my resolution. Thanks for the tips, the replies and the videos.
@John Devilman Yeah, loosing the mirror axis is a tricky thing. You can get it back though. Either by:
There's always a way to fix your msitakes.
This is my work so far. I will be happy for a bit of feedback :) https://drive.google.com/drive/folders/1VpBfIv1nIlONfwbMeSpNKkijU8nyU2CN?usp=sharing
@tobiasharryjensen Thanks for sharing your progress! I think the main thing to tackle are the general proportions. I have some notes:
Keep comparing your sculpt to references and where facial elements are placed. After that you can go in and define the head a bit more to get more detail.
Thank you @Julien for the kind feedback, i'll try working on the proportions.
This is my work http://www.noelshack.com/2021-11-4-1616101288-capture.png
My first attempt, still in trouble with ears and lips. I used to model the nose without adding a cube. No reference, freestyle character.
mmm, I don't understand how to post images, someone could help pls!
@daspona It's so far done via embedding images with markdown. But you can also just attach a link to an image/video/file if you want, which is easier.
@Julien Kaspar Thanks!
My result so far, I've learn many things with this course. It's not my first sculpt attempt but it's the first one where i go this far and understand much of what i'm doing.
https://cloud.blender.org/p/home/6047fe65b4bb1786d2aec7aa
Im currently on the esr, but everytime I even do anything, it starts to lag alot. Idk if i did something,but that was the first thing that happen when I turn on my laptop
@Kyla Anum If it's not because of your machine then make sure that the amount of faces is not too high and that no modifiers are visible in sculpt mode. For that you can remove/apply the modifiers or check the "Use Deform Only" option in the sculpt mode options (Header or Sidebar).
If you press ctrl + alt + q you can get multiple perspective views as well.
Hi Julien! It's probably my 25th time starting to sculpt the ear from scratch and even though i carefully followed your each step, my ear just can't seem to work but end up like a total mess. When interacting with any tool, especially smoothing with shift, it's just too "layery" that nothing works properly. For example, when i use the draw tool for drawing the "anti helix" it looks like thin flat layer bumps rather than regular round bumps. I hope i could make it clear. I'm dropping the image in the replies.
@Ceren Erdoğan Sorry but the image doesn't work for me.
@Julien Kaspar Sorry, can you try these? https://drive.google.com/drive/folders/1cgHoWsCTPBHUojZbNF1Hh1_eaqIFXrWc?usp=sharing ___ https://imgur.com/wJNt3hL __ https://imgur.com/ZSjzp1C%C2%A0 __
@Ceren Erdoğan Apply your scale with Ctrl + A and remesh. That should fix it. Always look at your current object scale values. If they are anything but 1, 1, 1 then apply your scale. If they are in any direction -1 then apply scale and recalculate the normals in edit mode with Shift + N, or remesh in sculpt mode.
Why u didnt turn on screencast? I cant understand how did u use mask tool.
@Mirlan Zulumbekov Sadly the screencast addon was broken during these recordings. So I decided to show all important shortcuts manually. I recommend to NOT use the mask tool addon since it is very outdated and most functionality is now officially in Blender. I am planning to make updates to the videos to show the official features.
I see u forgot to turn on screencast
Maybe it obvious but i have missed how to use any brushes with the mirror effect. Right now i have to paint eyes separately. Could you tell me what should i turn on and off to use this effect?
Hi, this is my first try ever on blender and here is what I made
https://pasteboard.co/JyHTyTE.png https://pasteboard.co/JyHTICK.png https://pasteboard.co/JyHTcRU.png
So here is my dilema, I'm not entirely sure how to go about the process of making my character! I want to make an animal, a character of mine and I planned to use this tutorial as a loose guide. The problem I'm having is that they have a mantle, like a cobra... I'm not sure exactly how I might sculpt that as far as what possible shapes I may use,,
If anybody is experiencing problems with changing the shape of the ear with the Grab tool, try switching to 'Projected' Falloff (from Sphere) and making sure symmetry is turned off.
I can't seem to figure out what you did when you added the empty and created a center axis to mirror the ear
*@jpaintr* Sorry if some of these methods are a bit advanced. Usually an object will take it's own origin and rotation for the mirror modifier. But for objects like the ear it can be great to keep that origin to move the ear around more easily.
Instead I am assigning a separate object to act as the mirror axis in the mirror modifier.
It's the field called "Mirror Object".
For this I usually have an empty in the world centre but you could also pick the head, body or any other object that is centred.
Hi, can you explain what the detail flood fill is? Thanks
*@romaingierenz* It fills the entire mesh with the level of detail that you have set for dyntopo. More info over here: https://docs.blender.org/manual/en/latest/sculpt_paint/sculpting/tool_settings/dyntopo.html
I can highly recommend to almost never use that option though. Use the voxel remesher instead ;)
Nicely understood many things.. My mind is able to dwell deep in the process... thanks so much
Hello,this is my sculpt! https://drive.google.com/file/d/1-uHQ3R8TGd3VUWjCUjdhovKrbJyK7Lcg/view?usp=sharing
Hi! These days I was practising with these tutorials! First I followed along step by step doing what you were doing :D (the only difference is that I used voxel remesher instead of dyntopo). And then I tried to do it with a more anime style! I simplified a lot of the details so it would fit better with the anime style (?
 Here are the results :D! I was wondering if you could give me advices or criticism to improve my sculpt! Thanks for the tutorials!
*@Vladimir Zantleifer* Looks like a good start. The interesting thing with the anime style is that the characters are actually very anatomically accurate. The eyes, nose and mouth are somewhat simplified and exaggerated in size but don't leave them undefined!
Your head shape is still very spherical and based on your reference it would actually need to be very much based on real human anatomy.
Don't let the flat colors of the drawings fool you that the shapes are soft and rounded. ;)
Your ears are also too tiny and too far in the back of the head. The reference is only showing the tip of the hear poking out of the hair so you would need to take some more real world references to get a better look at how to place and size the ears. And remember that anime ears are actually very realistic.
Look at this model from artstation as inspiration for the forms and anatomy.
*@Julien Kaspar* I will try to implement the stuff you said! Thank you a lot for giving me this feedback :D, It was very useful!
*@kurotsuki999* Looks good so far! Yes some aspects of the UI got changed a bit in previous versions but it's not too drastic. For the masking functionality, try the new "Mask Edit" pie menu by pressing A. This way you don't have to press shortcuts like Alt M and others all the time.
*@Julien Kaspar* Thank you so much! I am honored to learn from you! :)
@Renningen thanks :D Where to find "Detail Flood Fill" helped me a lot. It solved my problem with the disappearing mask.
*@Ceren Erdoğan* Just based on that description I can't really tell what the issue is, sorry. It could be that everything is masked? Perhaps you are using the wrong brush? Maybe the object has extreme scaling values and you need to apply the scale first. Maybe it's a bug and you could solve the issue by using one of the official releases like Blender 2.83.
If I make a he ears a different way than you, will it mess up the rest of the lessons down the line?
*@macgregorarney* I don't think so. You don't have to follow the tutorials 1:1.
*@RAMKRISHNA VERMA* Great! I think mostly the proportions and anatomy of the head needs some work. Some notes:
I am having an issue using the clay strips brush. When I use it normally (additively) it works fine, but when I hold shift to remove from the sculpt it is extremely weak. In order to carve out the eye sockets like you do in the video, I have to be sculpting for over a minute. My brush settings are the same as yours. What am I doing wrong?
*@noahpapagni* You have to hold Ctrl to subtract. Shift is Smoothing ;)
*@Julien Kaspar* whoops haha I have no idea how I got those confused. Thanks!
ignore
*@tyler.dan.bimrose* To give some feedback:
I think the most common issues in sculpting with Blender are scaled objects and inverted normals (the direction of the surface).
I'm guessing the inverted normals on the nose happened after you applied the scaling on the nose (Ctrl + A) and then it started looking this way.
The easiest way to fix this issue is to remesh the object in Sculpt Mode with Ctrl + R.
It's also a common issue to have non-manifold geometry (essentially broken meshes) but that can also be fixed with the remesher.
So apply your scaling often and remesh often :)
hi, im blocked at the begin i can't reproduce bisect steps on 2.83
*@Unruly Sherden* Make sure everything is selected before using bisect. There could also be a problem with the keymap. If you have a custom one try to switch back to the default or revert your settings.
*@Julien Kaspar* my bad, i just forget to hold and move above the icon to activate it, forgive me
hi there, unexpected selection is there after using lasso mask tool, not able to fine the solution.
*@Sundaram* Very likely because you are using x-mirror and are accidentally selecting parts from the other side.
Switch to Orthographic instead of Perspective (Numpad 5) to get more accurate selections
{attachment Invalid slug Blender_ - should be a static_asset id}
Here is my progress so far. It is supposed to be a teenage half orc, so some the proportions and shapes of the facial features are purposefully a bit off. Any feedback would be super appreciated.
*@Nicole Mangaroo* Here are some notes on the proportions since the rest is not that much defined yet:
Hello, Kaspar, thank you for an interesting and detailed lesson and tips, please indicate any obvious errors https://blender.cloud/r/mjUno6
*@Artyom Sobolev* Good job!
I think the side profile needs a few adjustments for example. It doesn't really match the character.
The jaw is also very straight a& low. Look at the distance between the jaw corner and the ear.
@Julien Kaspar good day, Julien! Please see how it turned out this time? https://blender.cloud/r/7DxLQU I also ask you to tell me how to correctly insert screenshots from the blender-cloud so that they are displayed as pictures, not links, I have already gone through a bunch of options, it does not work)
@Artyom Sobolev Looks a lot better. I definitely recommend to switch to perspective view instead of relying on orthographic too much. I'm sure the proportions of the face seem right but the face is probably too big once you see it with perspective. That's my most important note. But also the way the ears connect to the head and the dynamic between the eyelids/eye-sockets and brow seems very extreme. But that could be further sculpted over and blended if you join & remesh the objects.
@Julien Kaspar good day, Julien! Please see how it turned out this time? https://blender.cloud/r/7DxLQU I also ask you to tell me how to correctly insert screenshots from the blender-cloud so that they are displayed as pictures, not links, I have already gone through a bunch of options, it does not work)
Quick question are you making this from a reference or is this by imagination also i am not really sure how to work with reference in blender do you have any videos that could help with that
*@Akindeji Adesokan* I already went over this in a previous video ;)
If you mean importing reference images like turnarounds into Blender then you can watch this video from the Settler Project where I went over it.
After I mirrored over the eyes and ears, I was not able to manipulate one of the objects on one side and have the changes occur both sides even though I have x-axis symmetry on for all my tools. What am I doing wrong?
*@Nicole Mangaroo* In sculpt mode you cannot sculpt on both sides since one side does technically not exist.
There's no geometry to sculpt on unless you apply the modifer.
I am unable to Carve the eye sockets, is there something I could be doing wrong?
*@Dhairya Gupta* Might be too much auto-smooth or the scale is not applied? Hard to guess.
*@Julien Kaspar* you mean like the dyntopo value?, if that’s the case then my value is 3. all my scales are applied,
Edit : where to adjust the auto smooth value.
*@Dhairya Gupta* It's a brush setting. It adds smoothing automaticly to the stroke and this might work against the adding/subtracting of your brush.
18:28 Where is detail flood fill? I couldnt find it.
*@Mohamad Amirul Hakim* It's in the Dyntopo options when you are using "Constant Detail". But I cannot recommend to use this option in most cases anymore since it is very slow. Use the voxel remesher instead.
On 15:16 what hot key you used to activate lasso mask? Why lasso icon dont activate at instrument toolbar?
*@Artyom Sobolev* In Blender right now there are typically 2 ways of accessing any operation: The classic shortcut operator which is executed immediately & the new Tools in the Toolbar which usually don't have a shortcut by default.
You can hold down Ctrl + Shift + Left Click & Drag to draw a lasso mask immediately.
*@Julien Kaspar* hmm) When try combination in B2.82 in Linux Mint 19.1, blender interface freezes, the Linux visual environment stops responding, and only a forced system restart or x server restart helps. In Windows all fine!
*@Artyom Sobolev* Then it's very likely a linux issue. You can also load factory settings in Blender to see if it happens also when Blender is completely reset.
I am be able to use the Boolean modifier to integrate the sphere and cylinder. However, if I apply a modifier to a sphere, I can sculpt the sphere but not the cylinder. Why can only one be sculpted?......So I combined it with Ctrl + J and sculpted it.
*@a.yuyus.52419211* I can select both sphere and cylinder in object mode but only sculpt sphere.
*@a.yuyus.52419211* I don't have a lot of info to go on but it's probably because you didn't delete the cylinder after the applying the boolean modifier and it's blocking the view. The boolean modifier does not join objects but instead adds a copy of another one and merges them.
*@Julien Kaspar* Does delete mean hidden? I forgot to hide the cylinder. However, I cannot sculpt only the part of the cylinder.And I don't understand the meaning of " it's blocking the view ".
*@a.yuyus.52419211* Delete means deleting ;)
You can keep it around but if it's visible on top of your merged model it will obscure what you are looking at and sculpting (blocking the view).
what do you think
*@ammar mohammed* It's a bit hard to tell from the size of the image. I can recommend to give the 3D Viewport a bit more space and make the properties editor to the right a lot thinner.
Overall the proportions of th head seem ok but the nose-bridge, eye-sockets, back of the head and ears could use some better shapes.
The ears and neck are also leaning forward a lot.
The lips and eyes are also mostly just looking tagged on, there are volumes and eyelids missing that really makes them mesh well into the rest.
It's all a bit hard to explain and the best advice I can give is too not just look up anatomy references but also shape references.
*@Julien Kaspar* Stylized Face.mp4
*@ammar mohammed* I feel like nothing has changed
*@ammar mohammed* Sculpting human heads takes solid understanding of anatomy, shape-language and the sculpting tools you use or following reference faithfully until you acquired those skills. But you need to learn how to look at reference and analyze what is different between a realistic head and your current model and then iterate on it.
The more you tweak and the longer you work on it the better it will become, as long as you understand what you're looking at. It's the most crucial skill to learn.
*@Julien Kaspar* ok i will try fixing it
{attachment Invalid slug Blender - should be a static_asset id}{attachment No slug given}
Here's my version so far. Any tips on improving
*@Jonathan Jomo* That's already a good base to work further on. Well done.
My notes would be that there are some anatomical issues like the jaw being very straight and low. Look at the distance from the ear to the jaw-corner for example.
The face is also very flat and has little to no profile. The mouth, nose & forehead could peak out more.
The skull shape also seems to be very sphere-like from the side. It of course depends on the ethnicity of the character but in most cases the forehead is having a bit of a turn into the back of the head instead of a smooth transition:
https://www.cgstudio.com/imgd/l/65/57273c5561946ec8368b4567/4994.jpg
The sculpt is also still very blobby and could use a bit of polish, otherwise the design is too muddled from the start. Using the smooth, scrape and grab brushes often instead of mostly the draw brush will help and takes time to master. But keeping your shapes clean is an important skill to learn.
The neck is a good example where the shapes are very unclear and the trapezius muscle is almost non-existent.
*@Julien Kaspar* Thanks for feedback. I will take time to practice what youve said.
When I try to sculpt the eyes, I am unable to sculpt the head. Dyntopo is only affected the recently added nose and ears. What is going on? Why won't can't I sculpt the head portion?
nevermind! I just realized I didn't add scale and rotation :)
I'm having trouble sculpting the eye sockets. My specific issue is that no matter what tools I use, I end up with tiny facets or lumps wherever I create any kind of stroke. The smooth tool does not get rid of them. I am using dyntopo. I also looked at your brush sizes and strengths, but mirroring those values still produced this issue. Are there any other brush settings you reccomend? Or could it be a different issue?
*@bellasalvador1014* OK- I figured it out. After some research, apparently I somehow had Lock for my X axis enabled. Turning it off completely solved the issue!
*@missionyyn* Having the same problem! Really need an answer to it. It's frustrating following the guide only to have something not properly mirrored. I've tried 'symmetrise' on the head. I've set everything to position 0,0,0 and other methods of ensuring it is perfectly centered and mirrored. But the nose just clearly isn't right.
*@inuki777* I understand now what the issue is you are having.
The thing you need to know about quads (faces with 4 sides) is that they are not always perfectly flat. A quad is always in reality 2 triangles.
If you move 2 opposite corners up in the same direction, the quad will be visibly split, which happens automatically.
You don't have a say in which direction the quad is split.
Select everything in Edit Mode, press Ctrl + T, then press F9 and set the Quad Method to " Fixed". This is what your mesh actually looks like as triangles and here you will be able to see the issue.
If you plan to subdivide the mesh then this will not be a problem anymore.
If you remesh the object you can always symmetrize it again (symmetry options in the header of sculpt mode or search for symmetrize with F3)
@missionyyn I had a similar problem but I added the symmetrize option to the nose too and it seemed to solve this issue. Let me now if that does anything.
@missionyyn @inuki777 @Julien Kaspar i finally figured out how to fix the issue. you have to turn on proportional editing after you scale down the edges. that fixed the problem for me
@Muhammed Shagari Like This
0:35 what is the shortcut to reshape the nose please?
*@missionyyn* The way how Blenders shortcut operators work is that you can use any shortcuts like move, rotate or scale and then you can press additional shortcuts for extra effects. You can see all available operator related shortcuts usually at the bottom in the status bar.
For example when pressing S to scale you can then press X to scale only along the X-axis. Or you can press Shift X to scale along the X-plane (Y & Z axis). When pressing X another time it will by default switch between the global and the local x-axis.
If this is too hard to learn all at once I can recommend to use the Tools on the left as a start-off point since they have a visual gizmo to click on as well. The additional shortcuts also work with them but they are a bonus.
But learning all the shortcuts lets you work very fast and efficiently like learning how to play a keyboard with all fingers instead of just the index finger of one hand :)
*@Julien Kaspar* Hi. I am also having the same issue with the nose being asymmetrical at the 0:34-0:35 step. I am a beginner-intermediate Blender user. I have scaled the front plane of the nose along the x axis just like you did by using the S and X keys. I even tried both local and global scaling along the x axis. Both yielded the same result: an asymmetrical looking nose. After looking very closely at your demonstration, I noticed yours was asymmetrical as well, but only for a split second. It appeared to almost fix itself immediately after doing the transformation. I can't figure out what I'm missing!
*@bellasalvador1014* The only other factor I can think of is that the pivot point is off center (By using active element or the 3D Cursor instead of Median).
That split second that you are talking about: I think you mean that when you press S it will first scale along all axes but once X is pressed afterwards it will switch to only one axis and undo the scale on the other 2.
*@Julien Kaspar* Thank you for the reply! Changing the pivot point did not solve my problem unfortunately (I tried all the options). I'm still not exactly sure why this issue is occurring for me. For a while I thought it was the main head mesh somehow being slightly asymmetrical from sculpting (and therefore causing a weird overlap area), so I even symmetrized it, but to no avail. Luckily, I was able to get the nose looking pretty symmetrical by messing with other vertices in edit mode while still keeping a nose shape (I scaled down the top face of the nose, and made some other symmetrical adjustments, and that seemed to make a big difference for some reason). There is one tiny imperfection still, but it is hard to notice, and I have decided to keep working and see what happens. Thanks again, and I'm loving the course so far.
*@Julien Kaspar* thank you julien , i will practice more and try to learn step by step. The thing i really want to figure out is how to fix the nose (which in this vedio is at 00:34 to 00:35 ), can you kindly tell me the way to do that step ?
*@missionyyn* I think I did. 00:35 when I scaled the face on the front of the nose along the x-axis?
I can actually recommend the Blender Fundamentals on YouTube if you are new to Blender since this will be too hard to follow later on :)
https://www.youtube.com/playlist?list=PLa1F2ddGya_-UvuAqHAksYnB0qL9yWDO6
*@Julien Kaspar* that is surely an solution, thank you have a nice day :)
Placing a basemesh in your scene, to use as a reference, can help greatly with understanding the head in 3D-space.
Having real sculptures, of a skull and a human head, will help you see how the planes and shapes wrap around the form.
Using putty clay to sculpt what you're trying to make, will allow you to see how the form squeezes and stretches when you shape it.
These are tools mostly used by illustrators, but having a good understanding of how 3D-space translates into 2D-space will help the sculpting process immensely.
Also, when sculpting the mouth, it will help to first inflate the area, then sculpt inwards, rather than outwards.
Thought I'd share mine. I didn't do the eyebrows as a separate object and as I'm typing this, that might be an issue for animation later? Either way, I'm impressed with Blender's sculpting tool! Thanks for the tutorials.
*@Simão Amaral* If you don't want to add eyebrows as separate objects, you can also just paint them on via vertex colors during sculpting.
Later for animation there's also the alternative of displaying a texture on the head to show where the eyebrows should be but it's generally just more versatile, handy & cheaper if the eyebrows are a separate dummy object.
Here's my version so far
*@William* Good job! Make sure that there's not such a deep, hollow area between the upper eyelid and the brow.
If you look at yourself in the mirror you probably notice that there's a lot of volume there instead of a gap.
In the lesson above I kept it straight instead to keep it neutral but eyes have different shapes overall ;)
*@Julien Kaspar* Yeah I was wondering about that but thank you I will puffin up LOL
Thank you for this great step by step. I am using your brushes and I love them! Here's my sculpt :D
*@calmels.gaelle* Well done!
Hello, every time I switch Dyntopo on one of my ears disapear. Can you help?
*@tinom16* In some situations the modifiers can't be visible in sculpt mode. Dyntopo is one of the cases where modifiers are disabled.
This could be better communicated by the UI to make it less confusing.
*@Julien Kaspar* Hi Julien, thank you so much for replying!
Julian, I am Having some weird issues with my smooth brush. 1st off the brush squishes when on the side of the cylinder and creates detail way too squished as well. You can see the cursor change width from 1st to 2nd image and the difference in detail on last image on the side than the main face. So I went back into edit mode and did Grid Fill on main face and added a cut to side to make all faces more or less same size. Connected and welded and removed extra vertices. Started sculpting again, no change. removed the mirror mod, no change. Also when you said to 1st smooth everything and make sure Dyntopo is on, so I did, my smooth brush is at this LOW detail level, 3rd image, and you can see my Dyntopo Detail Size. The 4th is same detail but different brush and you see it works fine except for that weird side squishing thing. I'm going to try to build another ear.' but keep this one around if you have a fix. Thank you. - Will
*@theartoframos* The squished cursor seems to be a new feature. It distorts the cursor based on the scale of the object, which is a nice indicator that your object scale is not the same on every axis. I can never recommend people enough to apply the object scale/rotation (Ctrl + A) very regularly to avoid odd brush behaviour.
At 02:00 I did this but I didn't comment on it, which is my bad. I did mention it in the previous lesson at 03:50 but it's worth mentioning multiple times since it's so important.
*@Julien Kaspar* WOW! Thank you for responding so quickly I sent that on a Sunday morning at like 0800 California Time so thank you for responding! Yes I remember that previously. I will remember doing this from now on before I do crazy deformations. Thank you again!
can you recommend me tutorial for hard surface object
*@jyotish kumar* https://blendermarket.com/products/hard-surface-modeling-in-blender
I have difficulty in making ear can you please help me https://drive.google.com/open?id=1hKa4k8UQ6azv9bN-eIEvp4oes8igjcmL https://drive.google.com/open?id=1zTpKizWXwflU5Bbh4OjThmw4u2LQh_tv
*@jyotish kumar* You're going in the right direction but it looks like you still have X-mirror in sculpt mode enabled. I can recommend to turn that off for now to sculpt on it freely. Just keep going and refining the shape and it will get better.
I notice that you switch between sculpt objects without going to Object mode and switching it there. How do you do this? I am sure there is an easy way. Any pointers?
*@jkutyla* I am switching between Object & Sculpt mode constantly but since I am doing it with quick gestures through the pie menu it's happening very fast.
*@Julien Kaspar* I am not sure if you know zbrush, but there is a feature, where if you click alt or something and then click on the mesh you want to edit it changed the thing you are sculpting on. So you are going to object mode, selecting a new model to sculpt. and hit tab and going to sculpt? I hope that feature gets added. I bought zbursh around 10 years ago. I am still getting the updates for free. I like Zbrush, but I like some of the work flow better in blender. So I want to spend some more time learning to sculpt in blender. Thanks for the help. This is a really good course
*@jkutyla* This is actually already possible in Blender but it's never quite clear which object you are currently editing. The feature needs a bit of polishing.
But here's how you do it: In the top go into the "Edit" menu and uncheck "Lock Object Modes". Now you can switch the active object and select new ones while not needing to go into object mode. Just hold Alt and click on another object. If all objects are set to Sculpt Mode you can switch between them seamlessly.
*@Joe Jara* perfection
@Joe Jara This is awesome! Hahaha
Do I understand right that once I have modifier added to eyes and ears I don't need to apply it before sculpting? Somehow when I start to sculpt my modifier disappears and I needed to add it again later, so at last I just applied it. But seams that you didn't have to apply it until the end.
*@lina-black* That's strange .... The modifier shouldn't disappear no matter what you do in Sculpt Mode. The only thing that can happen is that modifiers are disabled in Sculpt Mode if in the 3D Viewport header in the options "Deform Only" is toggled on. This option disables modifiers to increase sculpting performance.
*@Julien Kaspar* yes, you are right, I wrote it the wrong way. Modifiers are not disappeared, but it is not visible, f.ex. mirror modifier is not shown. I tried to find "deform only" option in header, but can not... can you tell more specific where it is?
*@lina-black* In the 3D viewport you can find it in the "Tool Settings" at the header or alternatively in the Sidebar under "Tool" (Shortcut "N" to open the Sidebar). There should be a panel called "Options" where you will find the toggle in. The toggle is only visible when in Sculpt Mode.
*@Julien Kaspar* thank you so much!!! Now I found it! So much to learn!!! ^_^
When I am creating a sphere for eye I am not getting any pop up menu in which I can choose to remove generate UVs... Should I somehow enable it?
*@lina-black* In the 3D Viewport header there's a menu called "View". There you can toggle on "Adjust Last Operation".
*@Julien Kaspar* thank you!!! now it is working =)))
im learning alot . just wondering . how do i do this and then mix with grease pencil ya know . face wouldnt be as detailed so im wondering if i could just crease in some minor ones then retopologize and be ok ? like the head is just there for better reference no ?
*@Cherico Hill* If you just want to create a base head to draw on with grease pencil and then any rough forms and primitive objects would be ok.
How did you start with a sphere with the high density mesh? When I added a UV sphere, my mesh was very low density.
*@Yang Qiu* I subdivided the sphere. You can do that easily by adding a subdivision surface modifier (Shortcut: Ctrl + 1/2/3/4) and applying it.
*@Julien Kaspar* Thanks! It worked
How did you reshape the nose at 0:35?Mine looks like that ,but i don't know how to make it look symmetrical,like you did it there?
*@vickyrulz.vignesh* I scaled my selection down along the X axis (Shortcut: S, X). I don't know if that answers your question.
I take back everything I said earlier. I have learned so much by simply following along. Although I have to rewind a lot because I can't remember all the short cuts ure using. But I have gained a lot of knowledge from simply finishing the head planar. Thank you!