Login to view this content
Join Blender Studio for just €11.50/month and get instant access to all of our training and film assets!

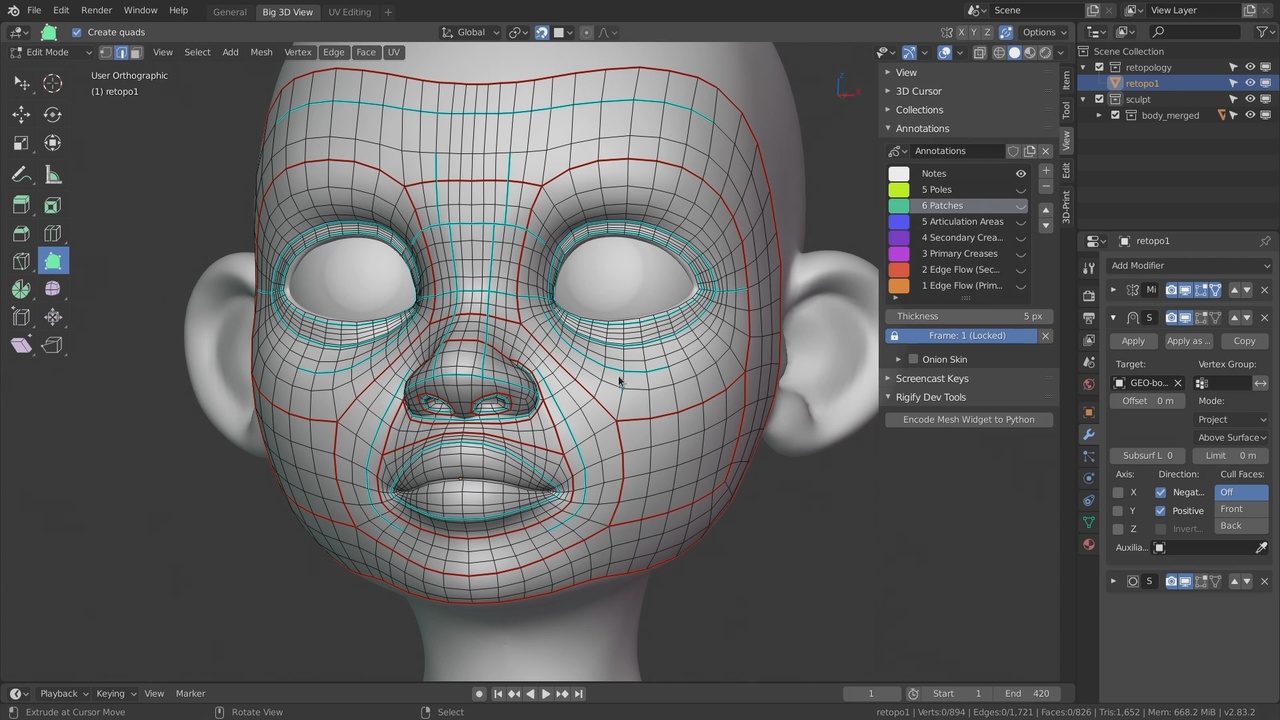
Facial Retopology - Creases & Tweaking
This is the last of 3 videos on retopologizing the face in practice. In this lesson finalise the retopology by adding additional proximity loops to highlight primary & secondary creases and improve support the curvature and deformations of the object. In the end the clean retopology should looks as close as possible to the original sculpt.
Other links:
- Rain - File 4: Retopology & UV mapping: The file that includes the original retopology of Rain.
- File 4: Facial Topology & Planning: More examples of the finished facial topology from the end of these lessons.
- Cheatsheets: A collection of cheat sheets, including the ones from this video.
General Links
18 comments

Hey Julien, I've finished my character's face and body retopology and have a few questions about moving forward. If I wanted to use hair particles, should that come after the UV mapping, color, etc? Likewise, since I'm not doing rigging, would it be best to add shape keys to this retopology? Finally, I was hoping to add this character to a portfolio, and present it as a fully completed character. Does it need to be rigged as well in order to be able to present this character as complete? SO sorry for all the questions, and thank you so much for the instruction in this course.
@Anna Ho I can recommend watching the short recap videos for some insight: - https://studio.blender.org/training/stylized-character-workflow/5df42aaf5f68a29e408d6118/ - https://studio.blender.org/training/stylized-character-workflow/snow-creation-recap/
For some answers: Once you have the retopology done you can just start with particle hair. The trick is to duplicate the head mesh as a new object that the hair will spawn from. That way the hair is never affected when anything changes on the rest of the character UV maps, textures, etc. I highly recommend spending some time with the posing and lighting of the character for a good presentation. Either rigging or sculpting works. Saving the pose as a shape key can help a lot, yes.

Hello and thank you for the tutorial but I have a question I am making a model and I want to retopology: to retopo all the head and body I have to follow the timelapses and adapt or look for myself (please don't) or I can follow Snow's retopology video ( which I do)?
@Osiris You can follow either of these videos. The timelapses will be more brief, but you will also find some interesting tips in the live streams for Snow if you like.

@Julien Kaspar How would the steps mentioned in this video differ with a slightly different workflow, e.g., 1) basic sculpt, 2) retopology, 3) add multi-resolution mod to bake basic sculpt's details, 4) increase resolution of multi-res mod as needed to complete a detailed sculpt?
@Mejjay That's a great question! For that workflow you would need to get very evenly sized quads (all sides ideally the same length) and the least amount of poles as possible. That way you can subdivide the mesh and it will have the same resolution everywhere and no visible stretching. That sort of surface is very easy to sculpt on and you would add details by sculpting them on the highest subdivisions.
The retopology I'm showing in these videos is trying to use the fewest amount of quads with all of the important details like creases and hard edges already modeled in. This is very hard to sculpt on when subdividing but it's ok since you won't need a multires modifier to get those details in there anymore.
@Julien Kaspar That's very helpful. I'll try my hand at both workflows to get a good feel for them. Correct me if I'm wrong, but it seems like the retopology workflow you're presenting is more advanced, like a step up from when using the multires mod. That isn't to say that getting all even quads and very minimal poles is something to laugh at. It just feels like accounting for primary and secondary creases takes it even further. A true master of the craft, you know?
@Mejjay Thanks! It's true that these tutorials are a bit more advanced. They are not what your would need for sculpting. This is to get the highest possible quality for rigging & animation.

Hi, I'm kinda confused. Will the shapekeys be somehow transferred to this one or do I have to do them again?
@sulemandawood911 No and no. This retopology will be used for the final rigging and animation. The one we did before is only for some quick test sculpting and will not hold up for any detailed facial animation. The facial sculpts are meant as a reference for the retopology and animation. They won't be used in the end for anything else.

Thank you, your tutorials are saving me :D! I just wanted to ask you if you'd also remesh a nose piercing and magical stones in the forehead into the face mesh or would you mesh it seperately?
@ktyjust You're welcome! I would pretty much always make it a separate mesh.

First of all, thank you for sharing your knowledge! This was a very helpful and great in depth-tutorial. One more question: After finishing the retopo, i realized that my edgeflow is incorrect, for example one edge goes from the middle of the ear to the tip of the head. Will there be serious problems during animation when the edge flow is not 100% perfect? :O
@thies91088 Loops not being closed into themselves happens a lot. As long as the general flow of the edges is ok the animators won't really mind. Having perfect patches and loops is mostly useful for rigging and selecting the patches easily. The cleaner it is the easier the rigging process will be. But even a rough retopology can be rigged in the end.
@Julien Kaspar : Thank you very much!


Hey, Julien. Got another question for ya when I use the relaxed brush and snake hook brush in sculpt mode the shrink wrap modifier keeps the mesh tight to the object I'm sculpting on, but when I go back to edit mode all the vertices are off of the sculpt. Am I doing this wrong, and does it even matter if my object and Sculpt mode show the faces the way I like?
Thanks.

*@Spencer Price* It's important to understand that the modifiers are not actually changing the geometry that you see in edit mode. Only once you apply a modifier does it truly appear in the mesh. In sculpt mode you will generally work with a preview that the shrinkwrap is giving you, just like in object mode.
Join to leave a comment.